

After some self-diagnosis and confirmation by replies to my post on the forum, I decided that it was either the cambelt tensioner or the cambelt damper pulley. So after doing some research on what needed to be done and pricing the required parts, I decided to go ahead and change the cambelt, cambelt tensioner, complete cambelt damper unit and the waterpump.
The following are the required parts, part numbers and prices from the agents. I decided to go for original parts for peace of mind and I also managed to get a decent discount.
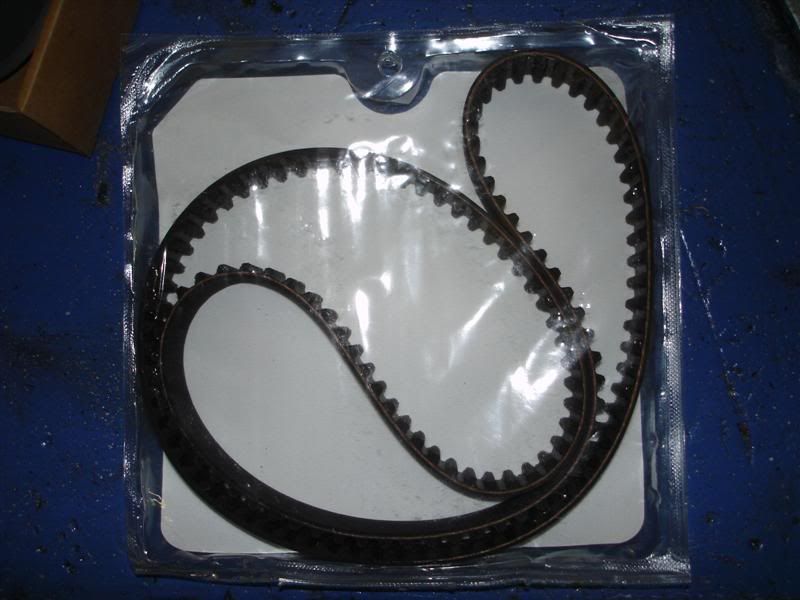
Cambelt
Part Number: 06B 109 119A
Price: R456.83 excl. VAT
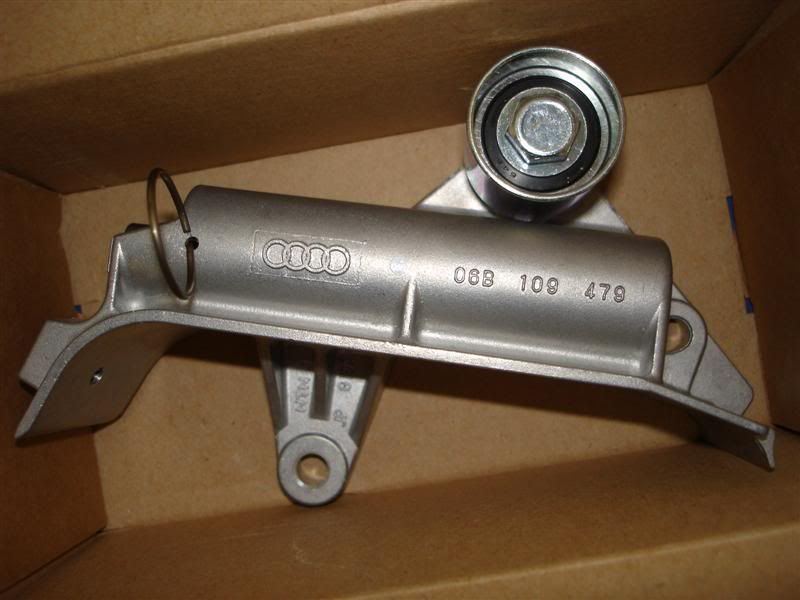
Cambelt Damper Unit
Part Number: 06B 109 477
Price: R1574.97 excl. VAT
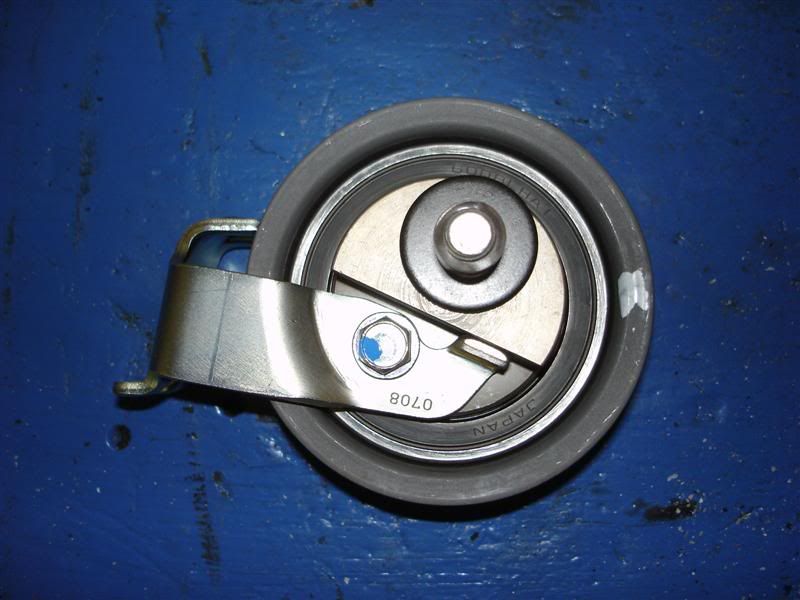
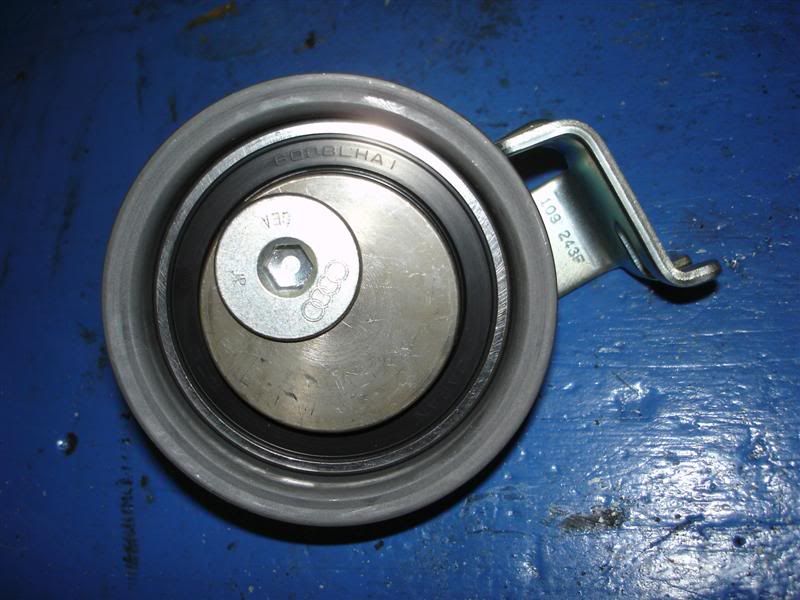
Cambelt Tensioner
Part Number: 06B 109 243F
Price: R739.01 excl. VAT
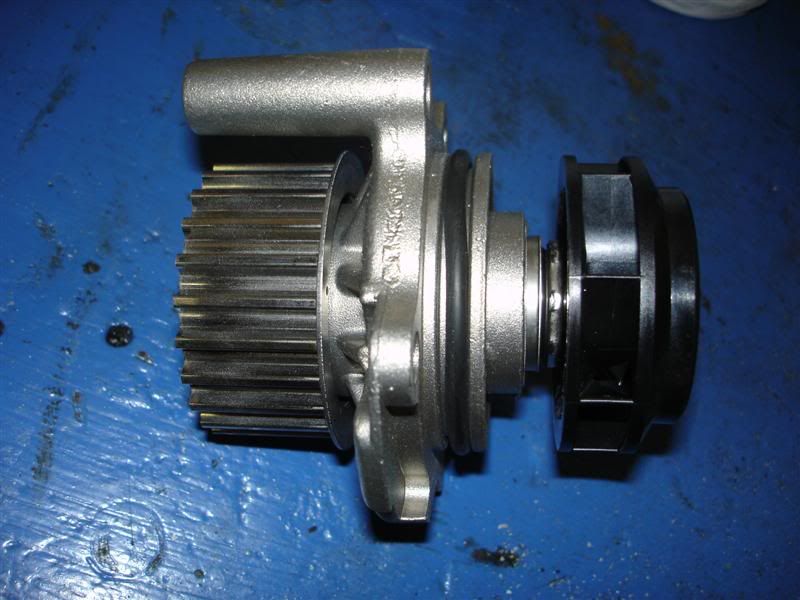
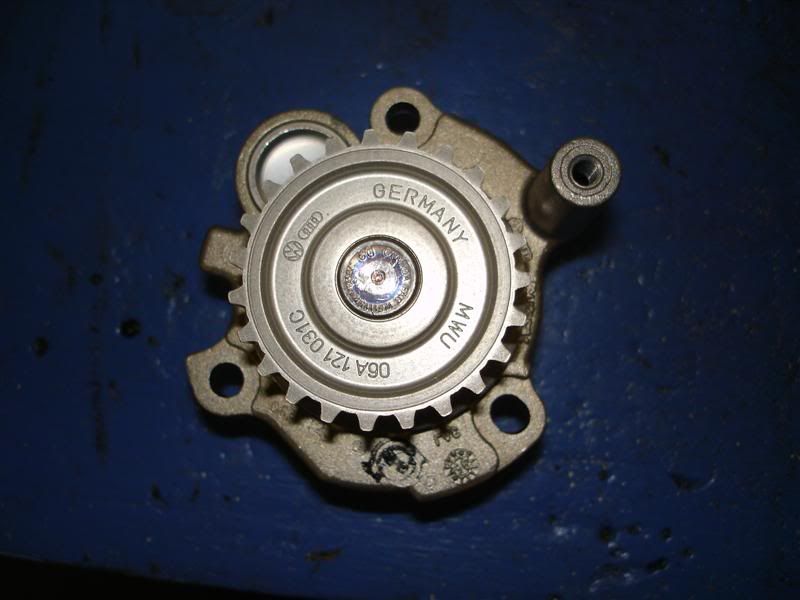
Waterpump
Part Number: 06A 121 012X
Price: R843.74 excl. VAT
G12 Coolant (2 x 1 Litre)
Part Number: G 996 A8GM1
Price: R102.60 excl. VAT
And here are the part numbers and prices from Goldwagen Edenvale:
Cambelt
Part Number: A1958
Price: R366.00 incl. VAT
Cambelt Damper Unit
Part Number: A2849
Price: R966.00 incl. VAT
Cambelt Tensioner
Part Number: A2655
Price: R783.00 incl. VAT
Waterpump
Part Number: A2350
Price: R366.00 incl. VAT
Cambelt
Cambelt Damper Unit
Cambelt Tensioner
Waterpump
Now for the process that should take around 10 hours to do.
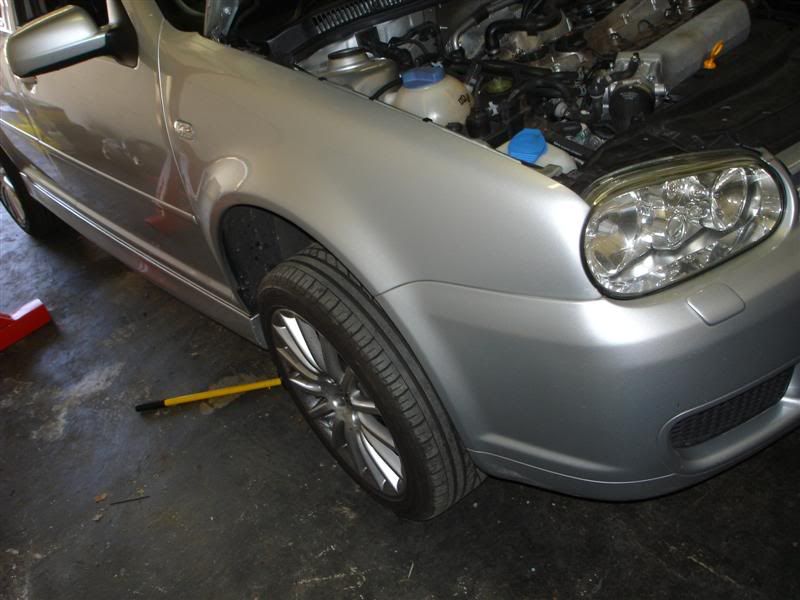
1. Jack up the front right of the car, support the car with a trestle and remove the front right wheel.
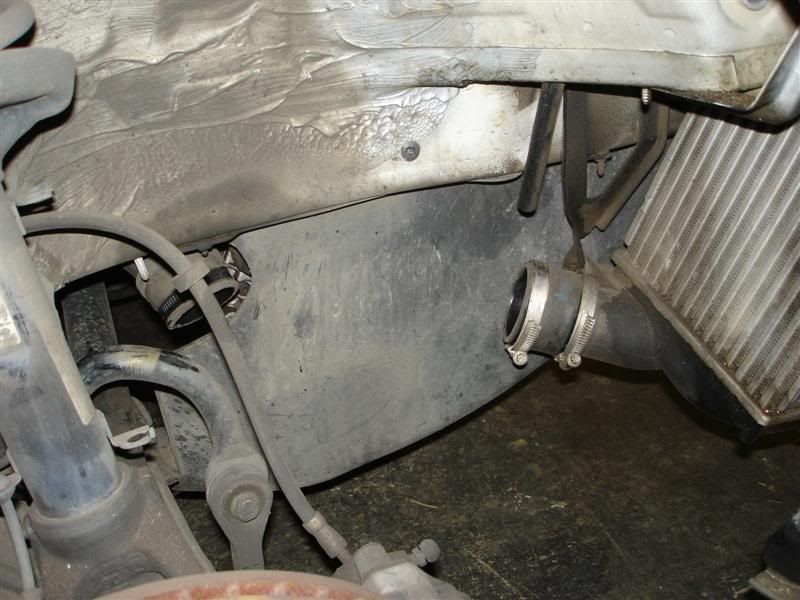
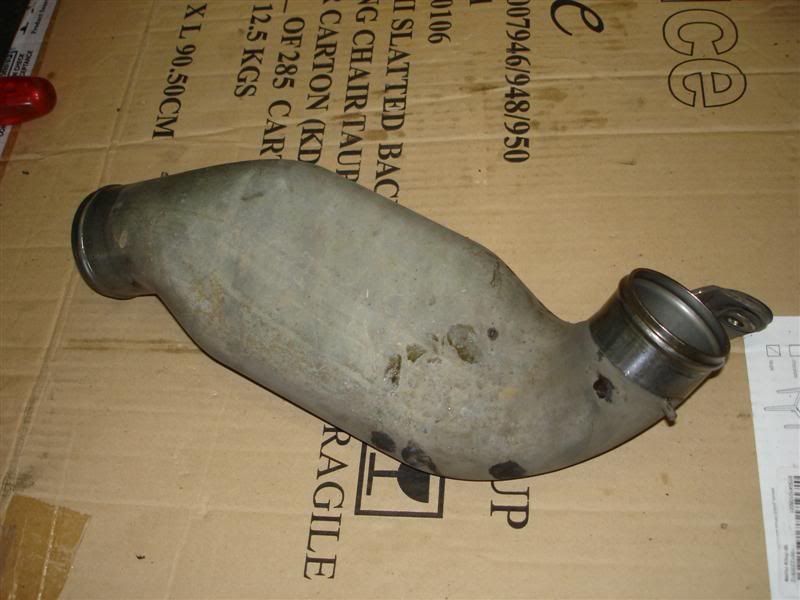
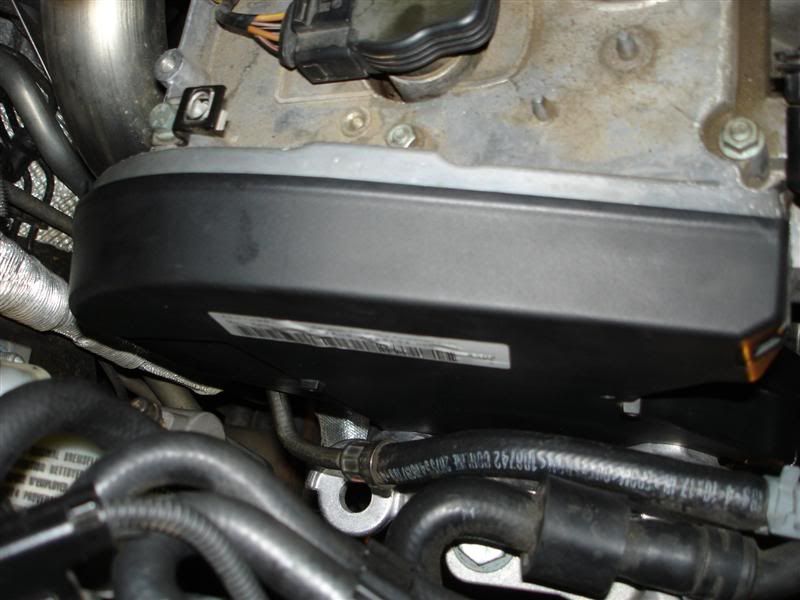
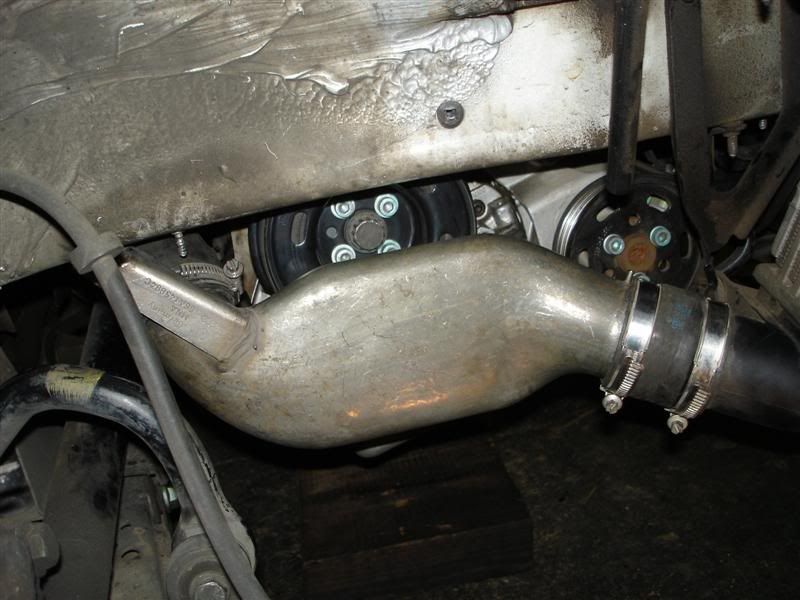
2. Remove the plastic wheel arch lining and you will see the steel “pancake” pipe that joins the boost pipe from the turbo to the intercooler. Loosen the 3 hose clamps (1 on the turbo side of the “pancake” pipe and 2 on the intercooler side of it) and the 10mm nut that holds the “pancake” pipe to the body (circled in red).
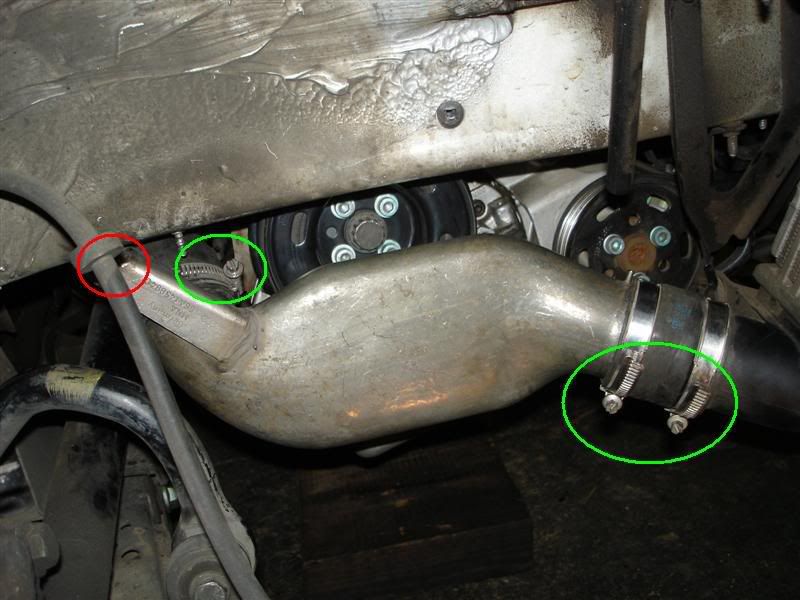
3. Twist the “pancake” pipe to break the seal that the hose clamps have made and then remove the “pancake” pipe.
4. Remove the right-hand engine compartment cover and you will now have access to the crankshaft pulley / vibration damper. While you are down there, remove the cover that covers the underside of the engine as well.
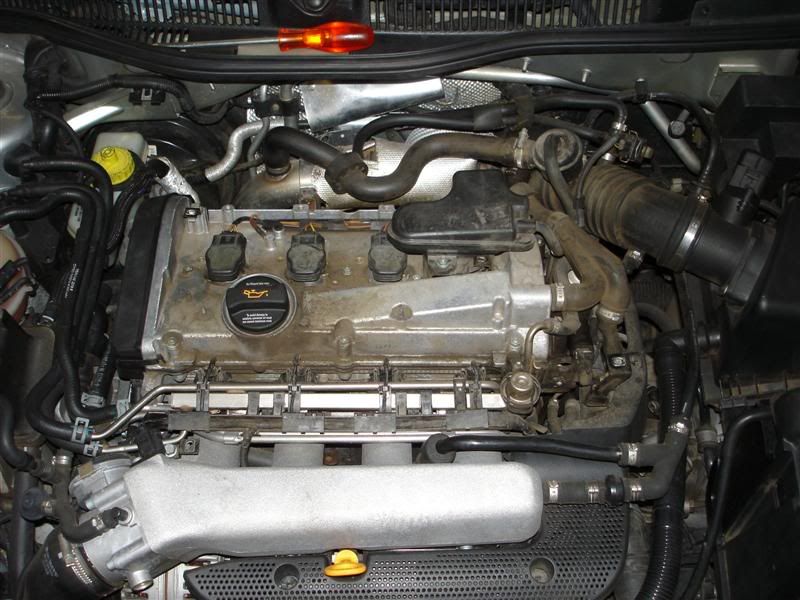
5. Move to the top of the engine bay now and remove the main engine cover and the small cover in front of the engine.
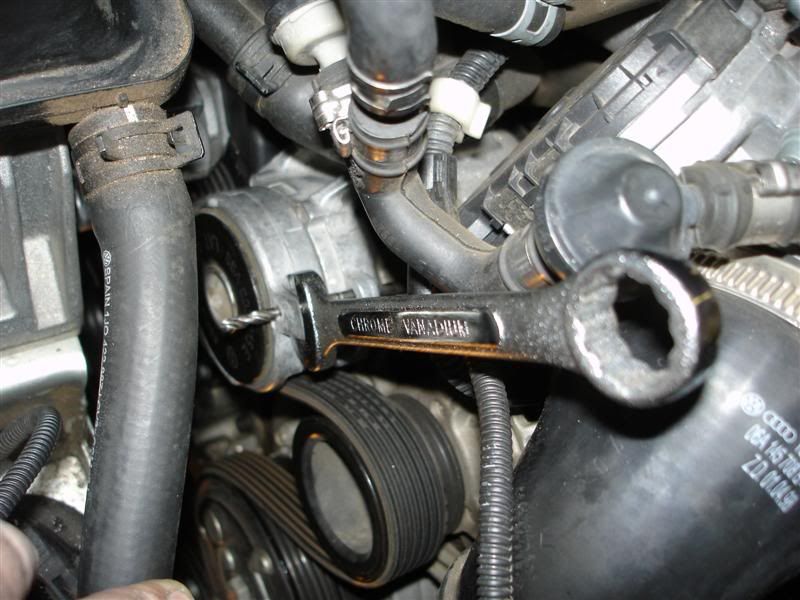
6. The next step is to remove the auxiliary belt and auxiliary belt tensioner. To release the tension on the auxiliary belt put a 16mm spanner on the tensioner, lever the tensioner towards the front of the car and then put a drill bit or something similar through the hole in the tensioner body to lock the tensioner in place. Remove the auxiliary belt, and note (preferably mark) the direction of rotation of the belt.
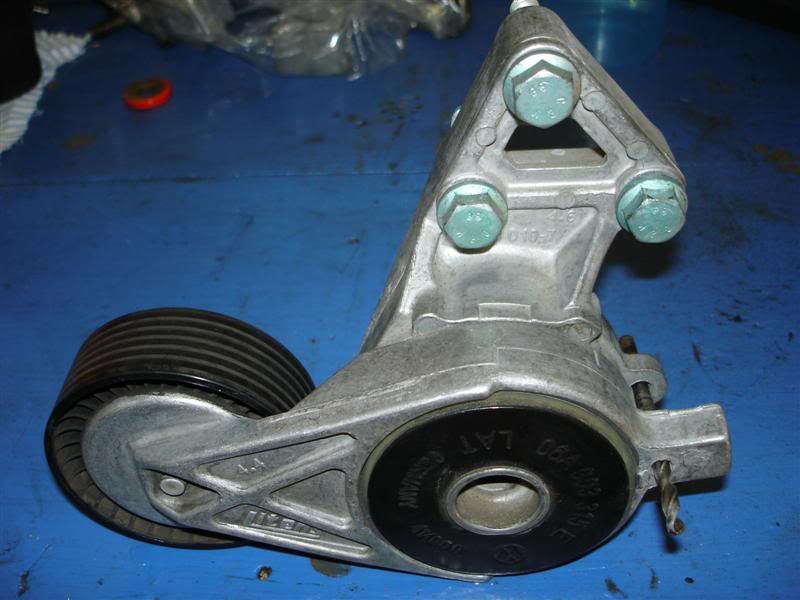
7. Remove the 3 x 13mm bolts holding the auxiliary tensioner to the engine (circled in red) and remove the tensioner from the engine bay. Not that the top 2 bolts also secure a pipe bracket in place.

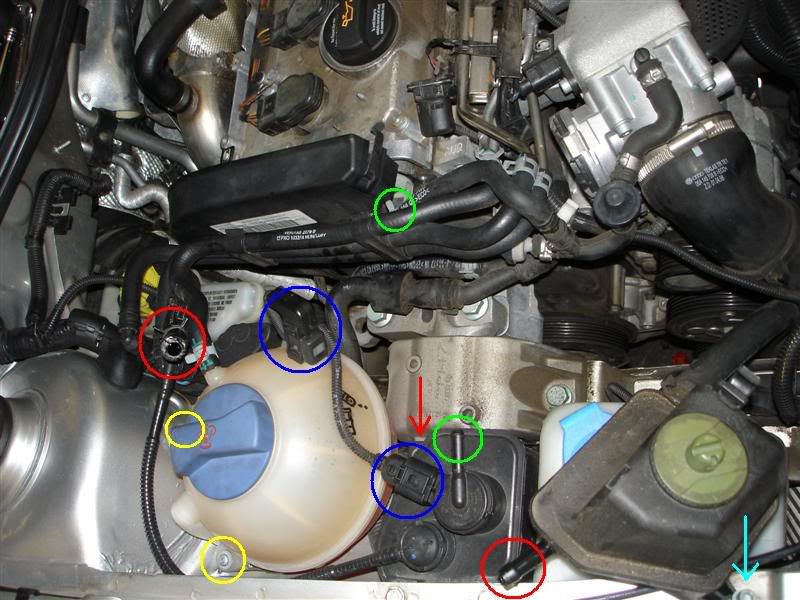
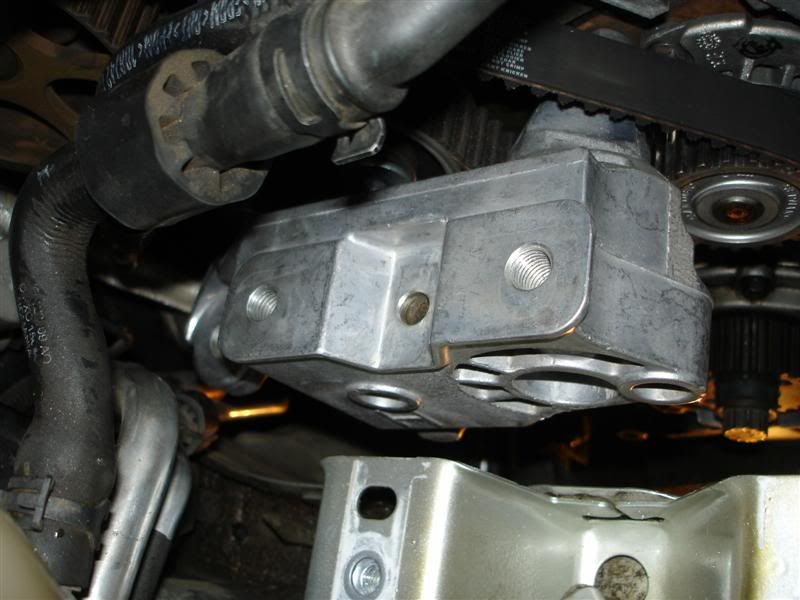
8. Remove the pipe from the power steering reservoir (circled in red), remove the 5mm Allen bolt holding the power steering reservoir to the engine mount (blue arrow) and move the reservoir and pipe out of the way. Note that power steering fluid will pour out of the reservoir and pipe, so if you can, block the pipes to prevent this from happening.
Remove the pipe from the charcoal canister (circled in green)) and move it out of the way.
Remove the sensor plugs from the coolant expansion bottle and the charcoal canister (circled in blue) and move them out of the way.
Remove the 2 Philips head screws that secure the coolant expansion bottle to the body (circled in yellow) and move it out of the way, but leave all the coolant pipes connected.
9. Now support the engine from either the top using an engine crane, or from below using a trolley jack with a block of wood between the jack and the sump so as to protect the sump from being damaged. Raise the engine until it’s weight has been taken off the right-hand engine mount.
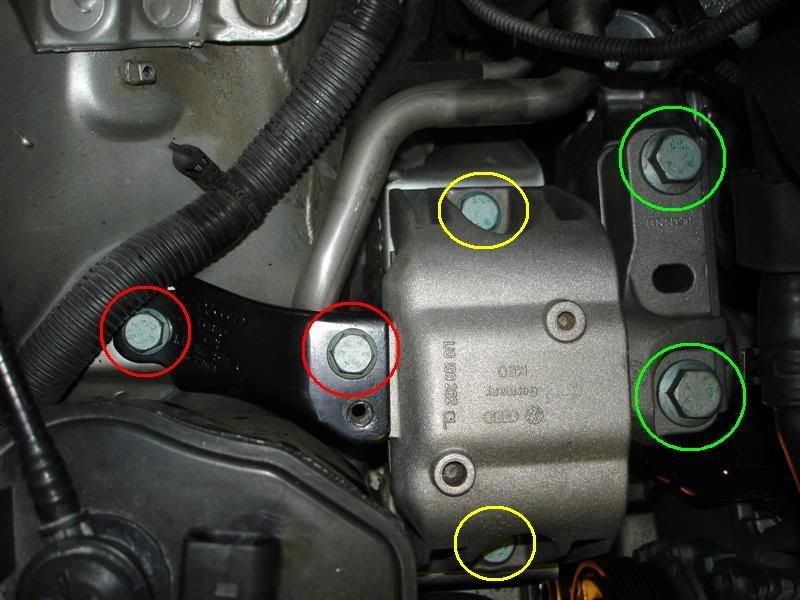
10. Loosen and remove the body-to-mount bracket bolts (circled in red), then the mount-to-engine bracket bolts (circled in green) and then finally the mount-to-body bolts (circled in yellow).

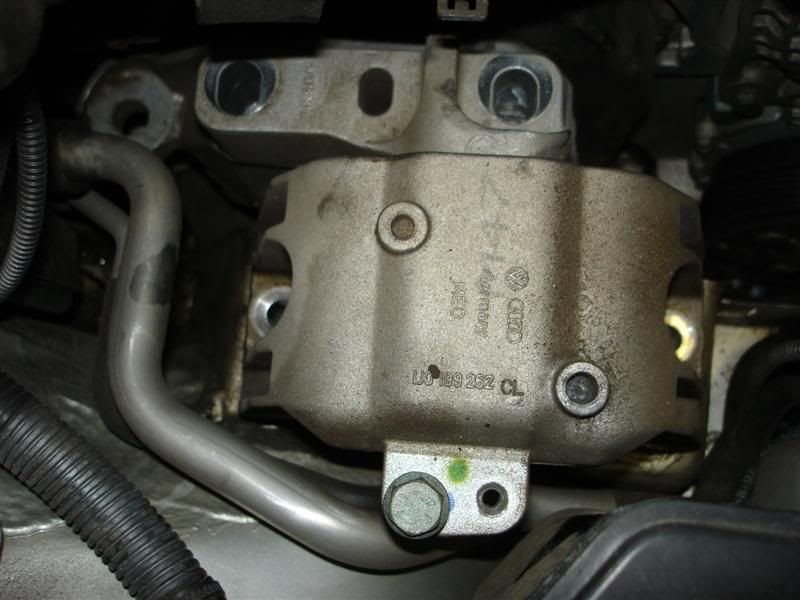
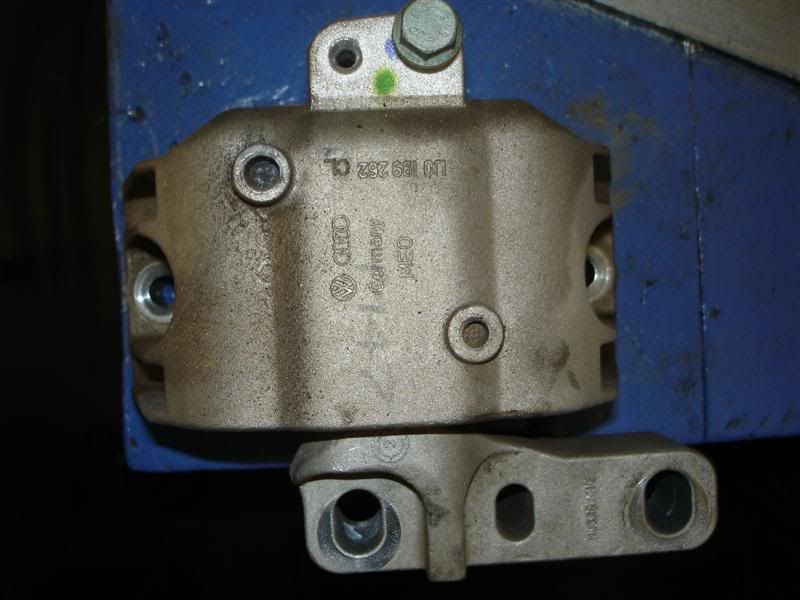
11. Remove the right-hand engine mounting from the engine bay.
12. The next step is to get the motor to TDC so that after the cambelt has been removed, it will be easy to fit the new one.
To do this, put a 19mm spline (multi-tooth) socket onto the crankshaft sprocket bolt and turn the engine clockwise until the following marks line up:
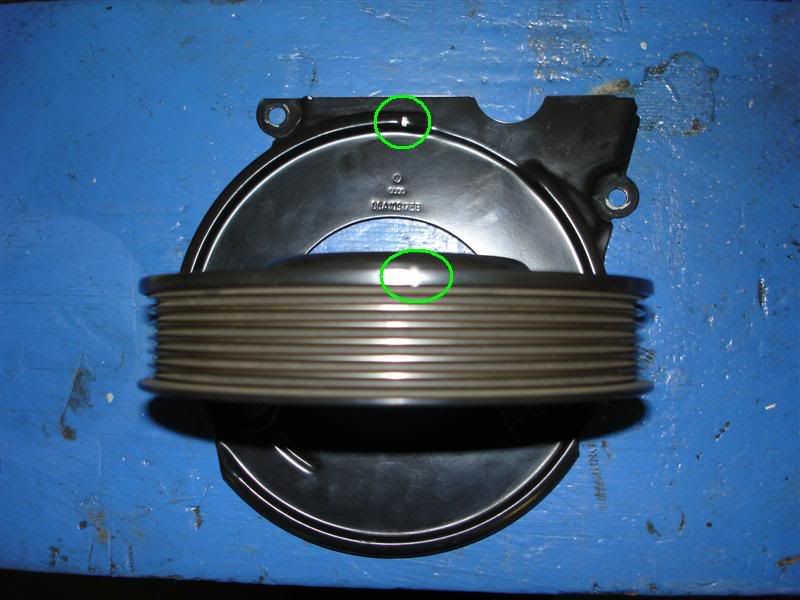
The mark on the camshaft pulley and the mark on the valve cover
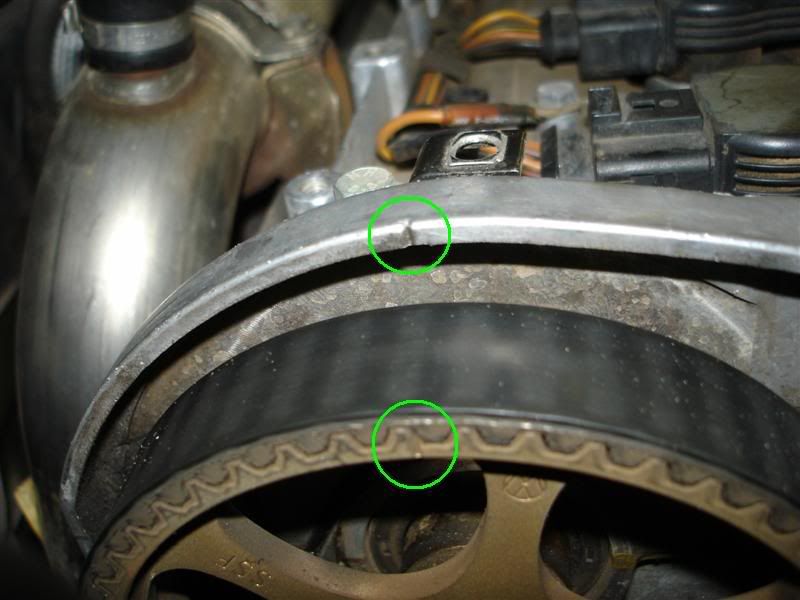
The mark on flywheel and the center of the gearbox inspection hole
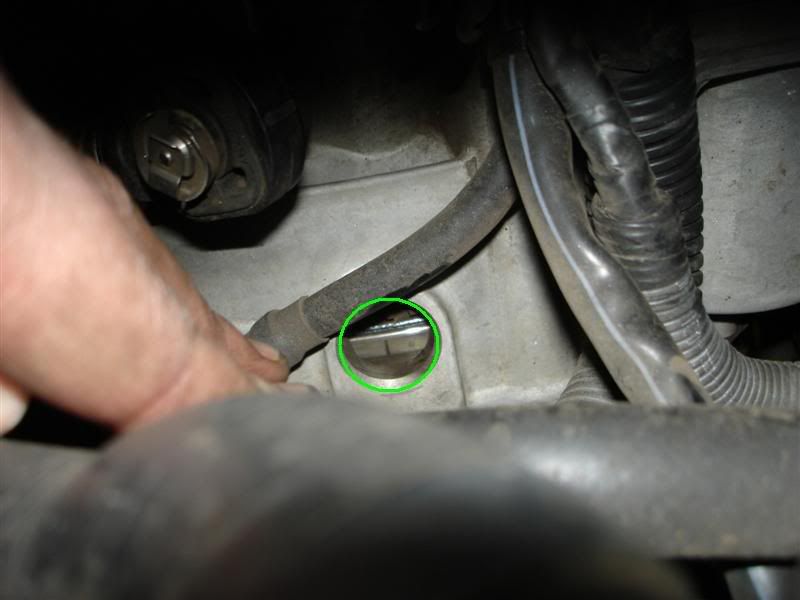
The mark on the crankshaft pulley and the mark on the lower timing belt cover. NOTE: These marks can be used instead of the mark on the flywheel, if the inspection hole on the gearbox can’t be seen.
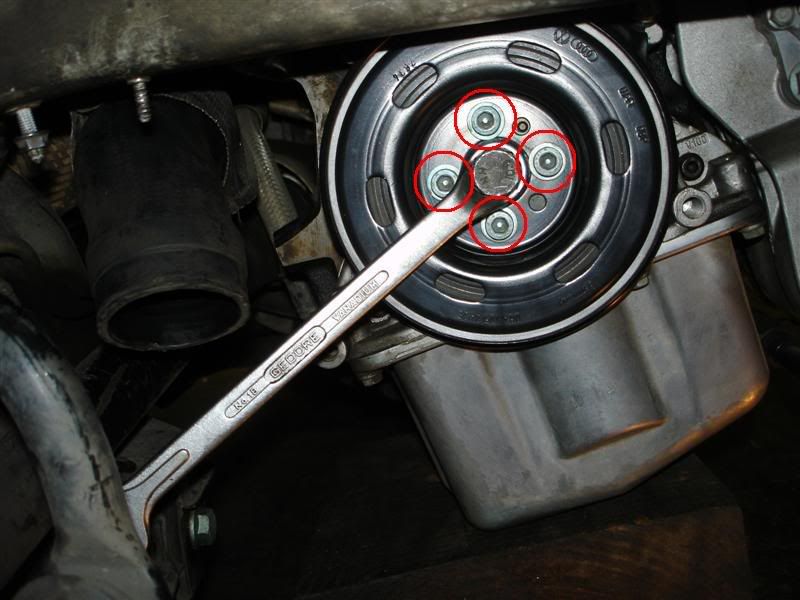
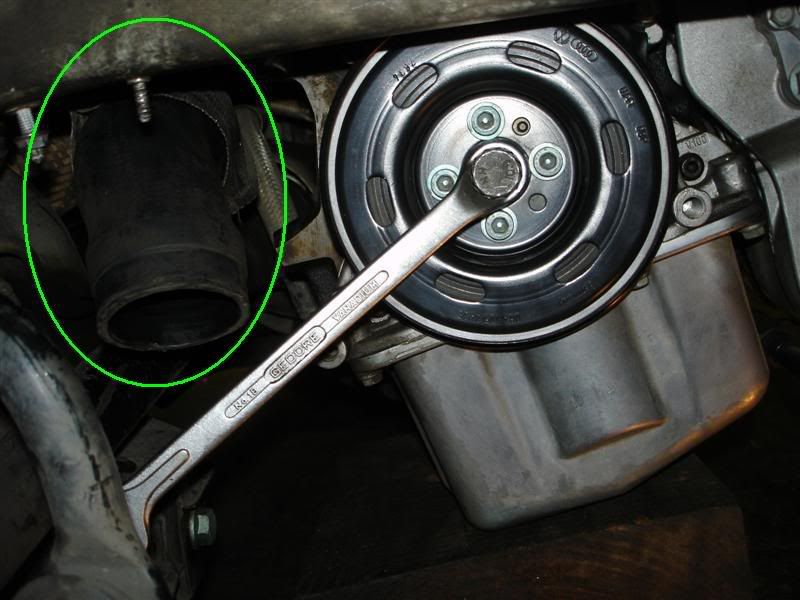
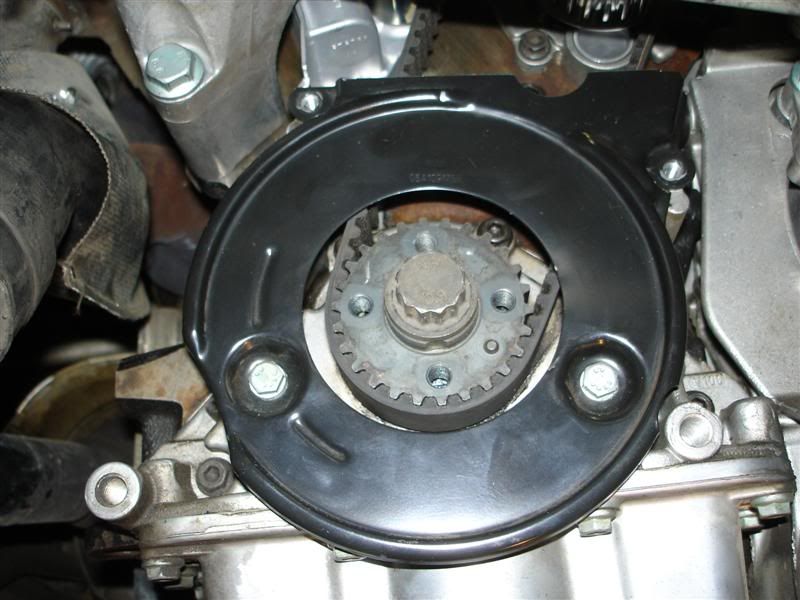
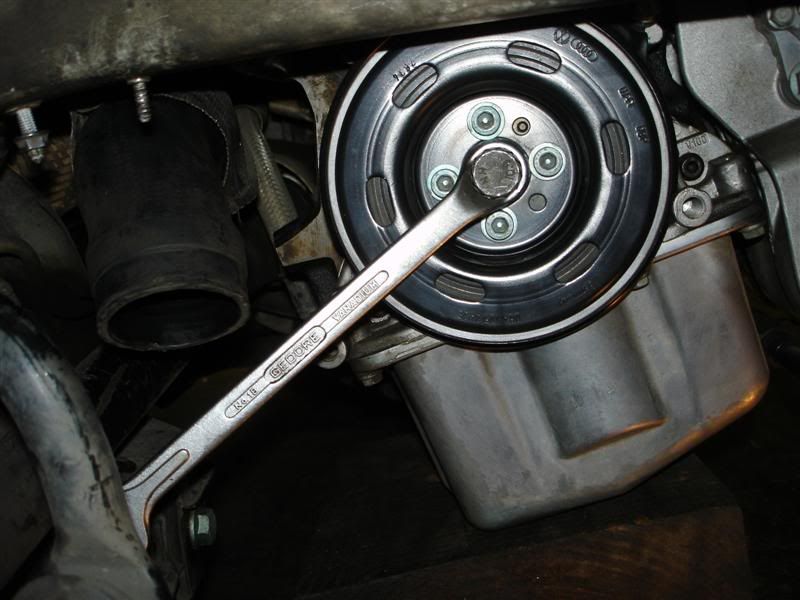
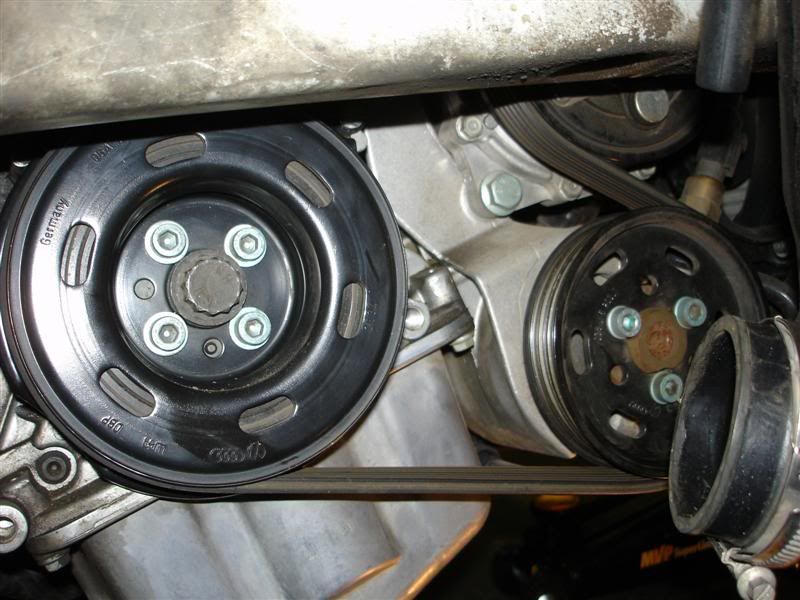
13. Remove the 4 x 6mm Allen bolts (circled in red) that hold the crankshaft pulley onto the crankshaft and pull the crankshaft pulley off. Put a 19mm multi-tooth spanner or socket onto the crankshaft sprocket bolt to prevent the engine from turning while loosening the crankshaft pulley bolts.
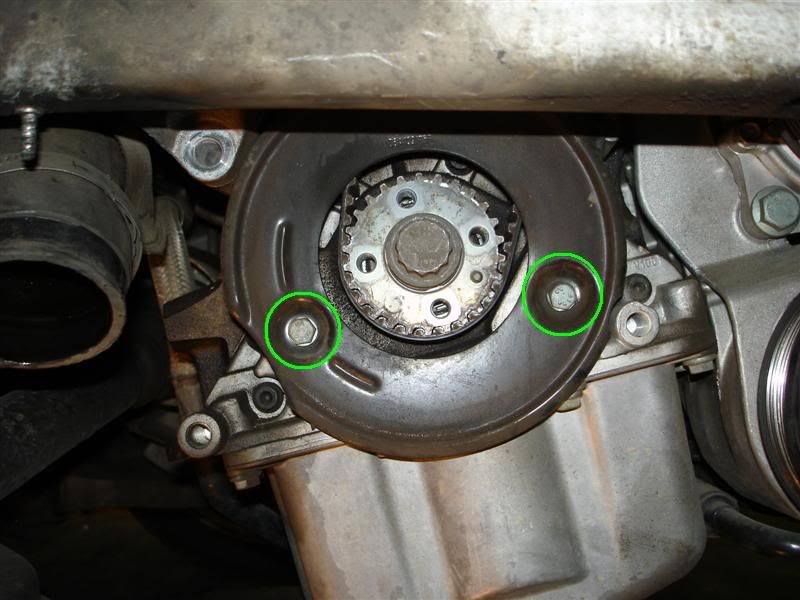
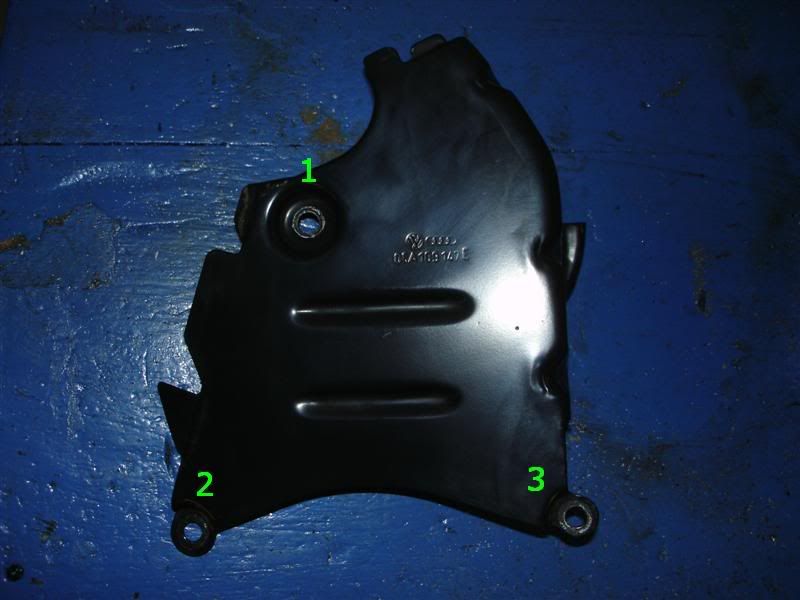
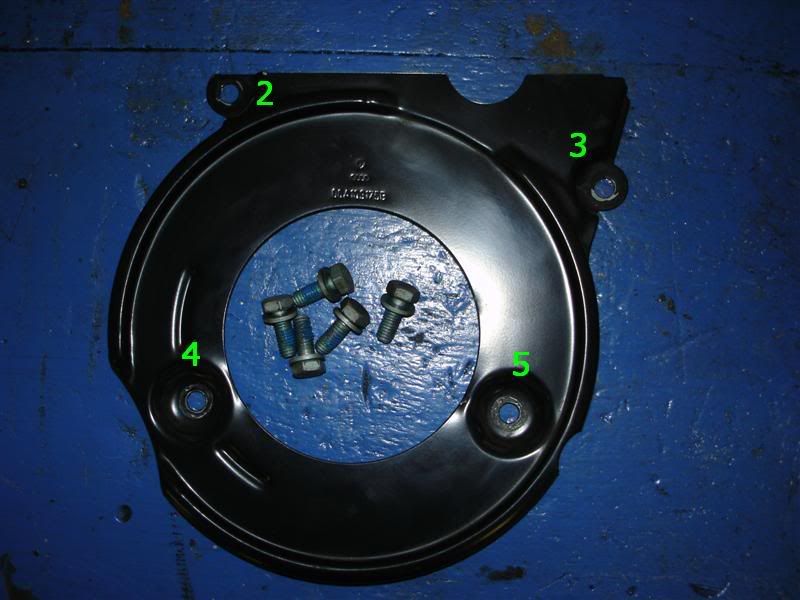
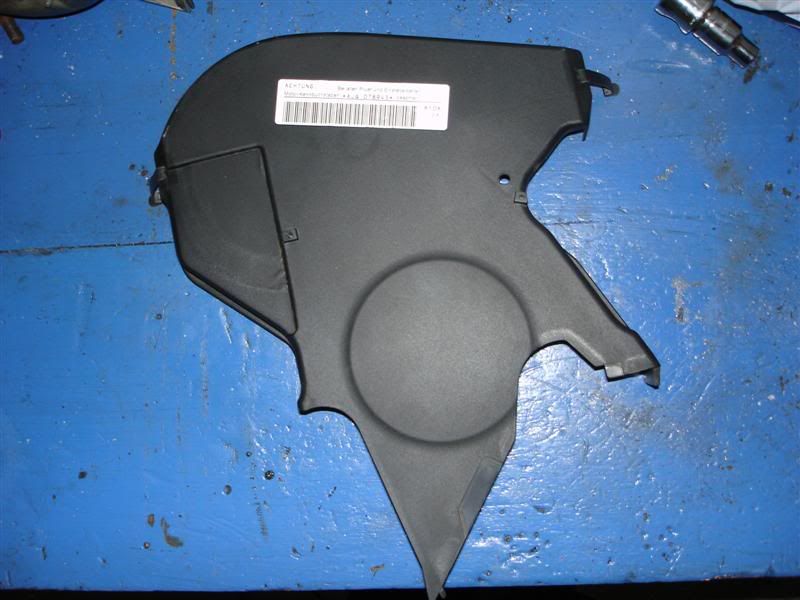
14. Remove the 2 x 10mm bolts (circled in green) holding the lower timing belt cover on and the 3 x 10mm bolts holding the middle timing belt cover on and remove the 2 covers.
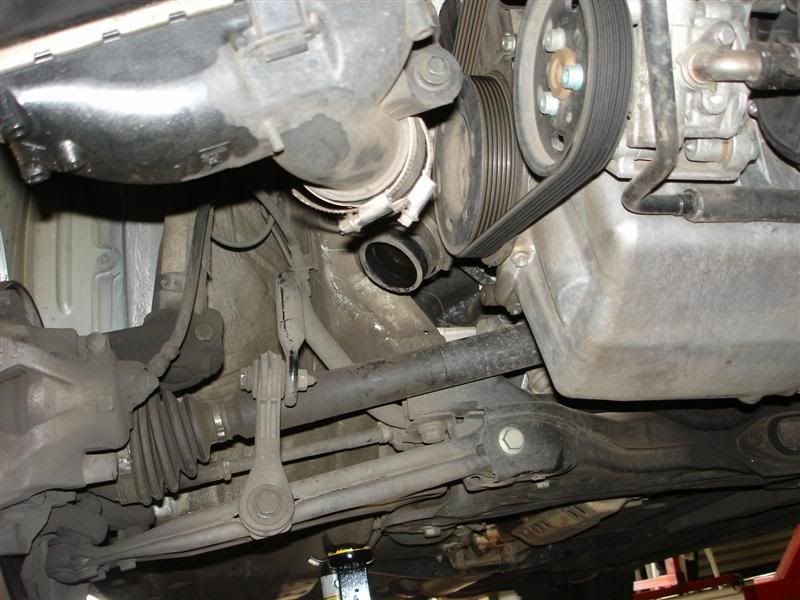
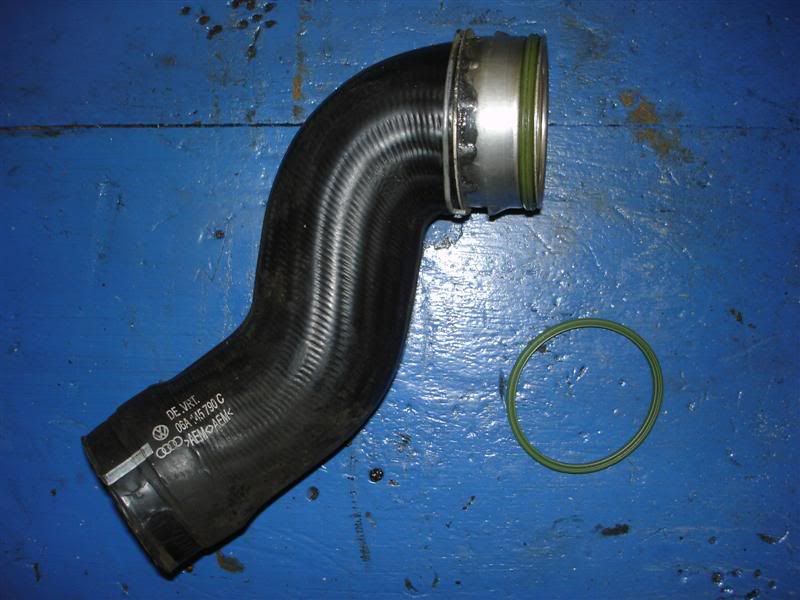
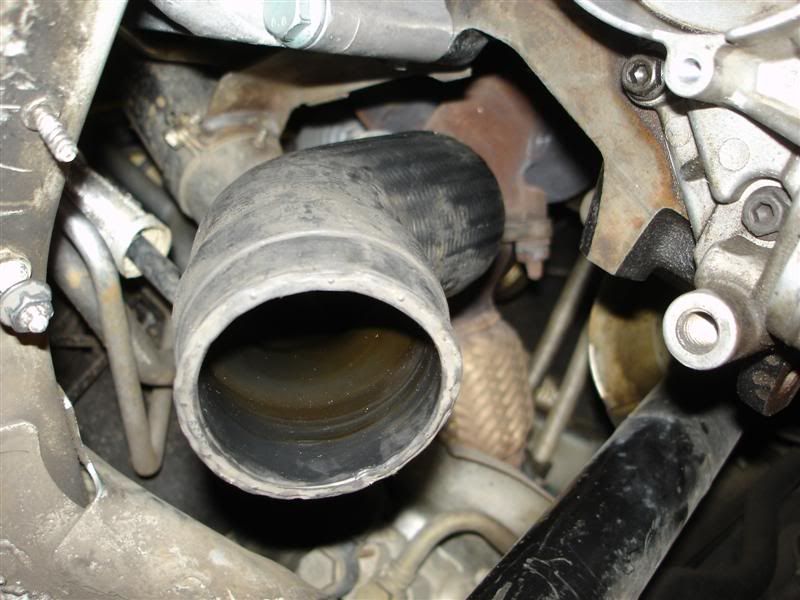
15. The next step is to remove the rubber boost pipe coming from the turbo, which makes it a lot easier to remove the engine mounting bracket from the engine bay.
Unclip the 3 press studs that hold the heat shield onto the pipe and you will see the quick-release clip that holds the rubber pipe into the steel pipe from the turbo. Use a screwdriver to lever the clip over the 2 tabs on the steel pipe and out of the 2 cut-outs in the steel pipe. You should now be able to pull the rubber pipe out of the steel pipe.

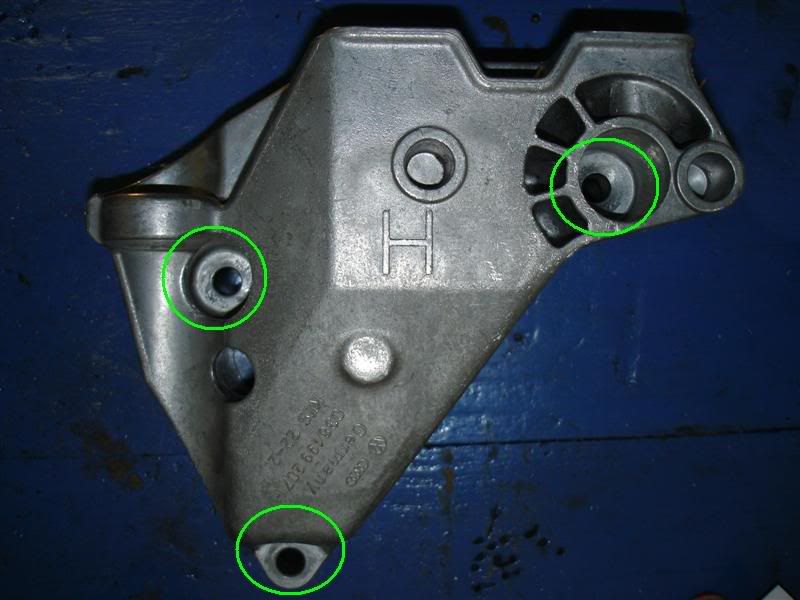
16. Now loosen and remove the 3 x 16mm bolts holding the engine mounting bracket to the engine block. You might need to raise the engine to remove the top 2 bolts and then lower it to remove the lower bolt.
Raise the engine a few centimetres and manoeuvre the engine mounting out of the bottom of the engine bay. If you can’t get it out, raise the engine a few more centimetres and try again.

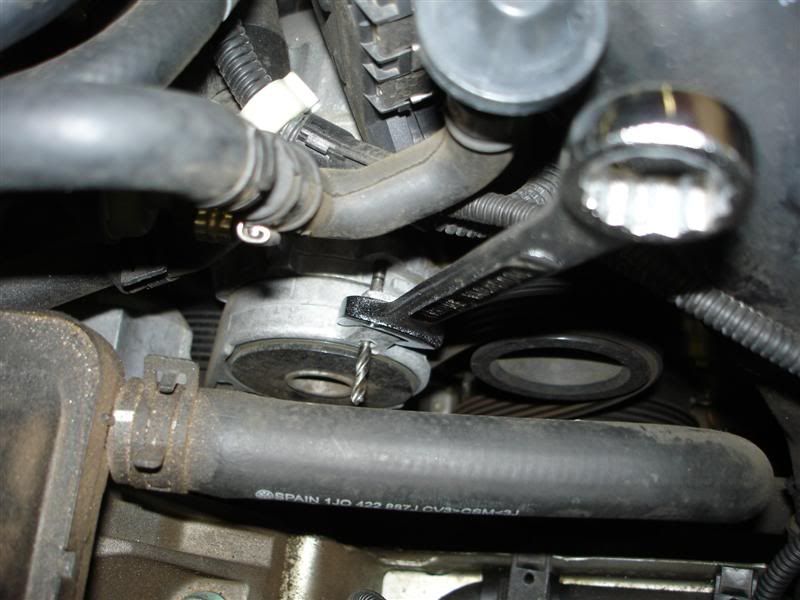
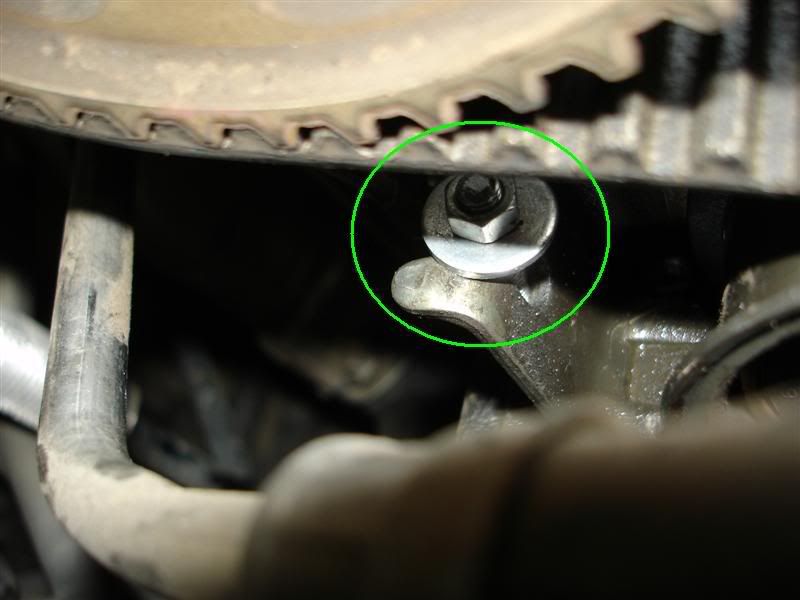
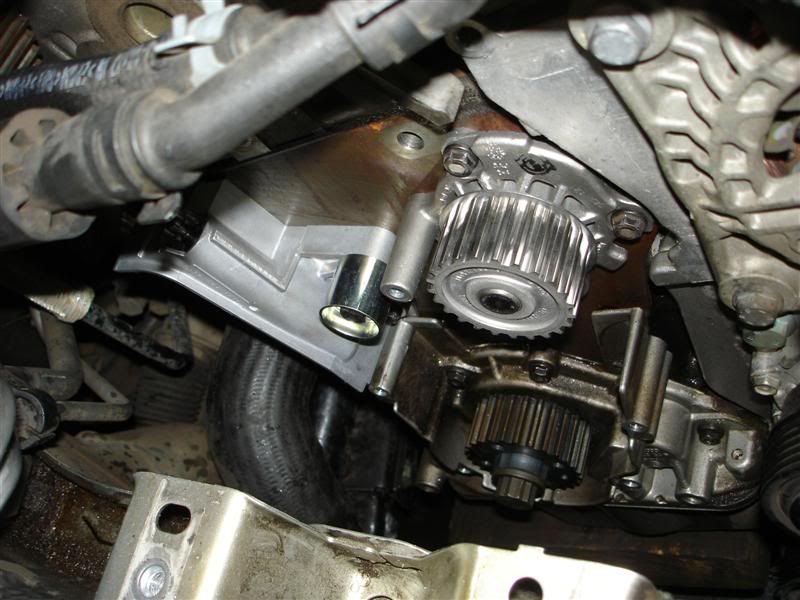
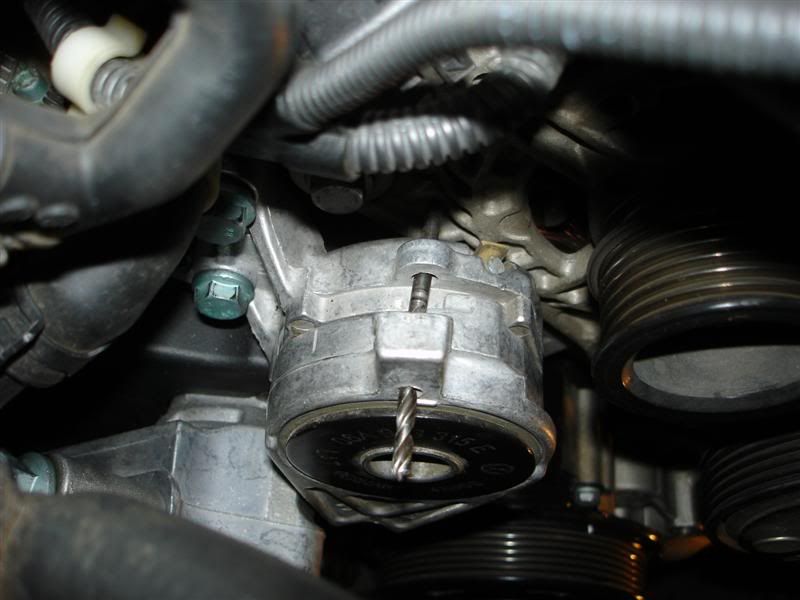
17. The next step is to release the tension on the cambelt by pushing the piston of the damper unit back in. To do this you need to screw an M5 x 55mm threaded bar into the threaded hole in the damper body, then put a washer on the bar and then turn a nut onto the threaded bar (circled in green). Slowly turn the nut until the tension has been released from the cambelt and then slide the cambelt off the camshaft pulley and remove the belt.
18. If you can, push a piece of wire or pin through the hole in the cambelt damper unit body and through the piston to hold the piston in place. You might have to rotate the piston so that the hole in piston lines up with the hole in the damper unit body.
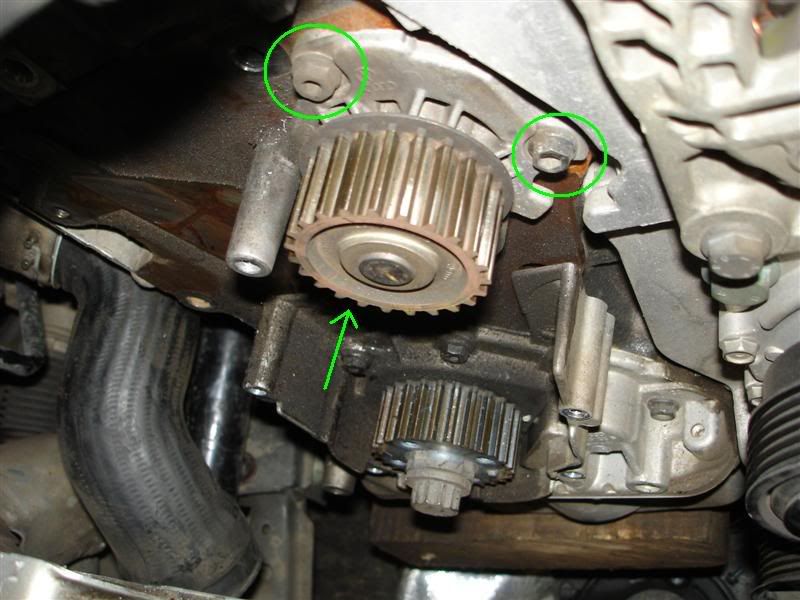
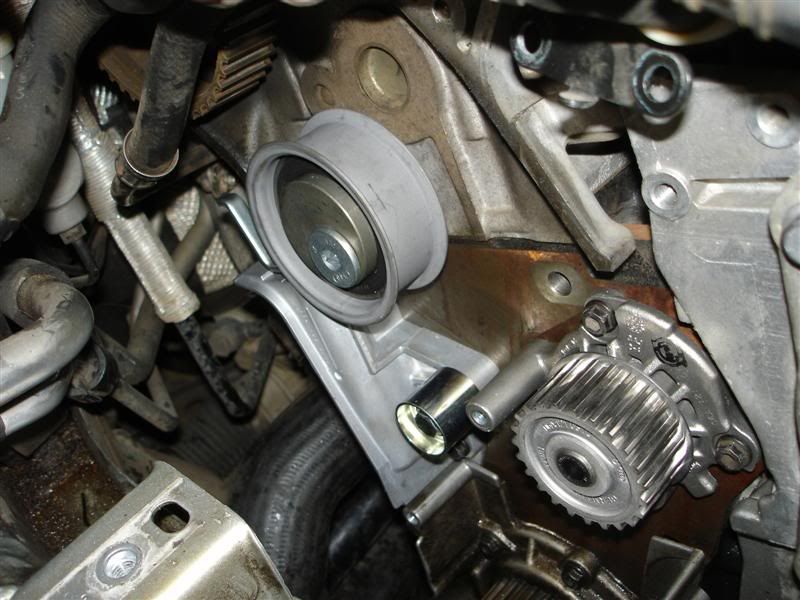
Loosen the 8mm Allen bolt holding the cambelt tensioner to the block (circled in red) and remove the tensioner. Loosen the 2 x 10mm bolts holding the cambelt damper unit to the block (circled in green) and remove the damper unit.
The green arrow shows the M5 x 55mm threaded bar screwed into the damper body. The red arrow shows the piston that pushes on the tensioner pulley to tension the cambelt. The yellow circle shows the hole in the damper body where you push the wire / pin through to hold the piston down.

19. Loosen the drain tap on the bottom left of the radiator and allow all the coolant to drain out. You can put a piece of hose on the drain outlet to make it easier to drain into a container.
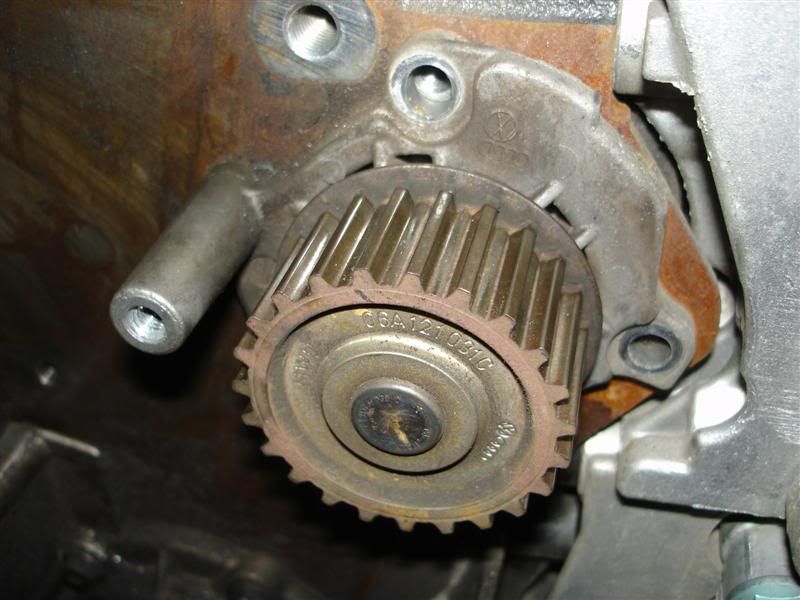
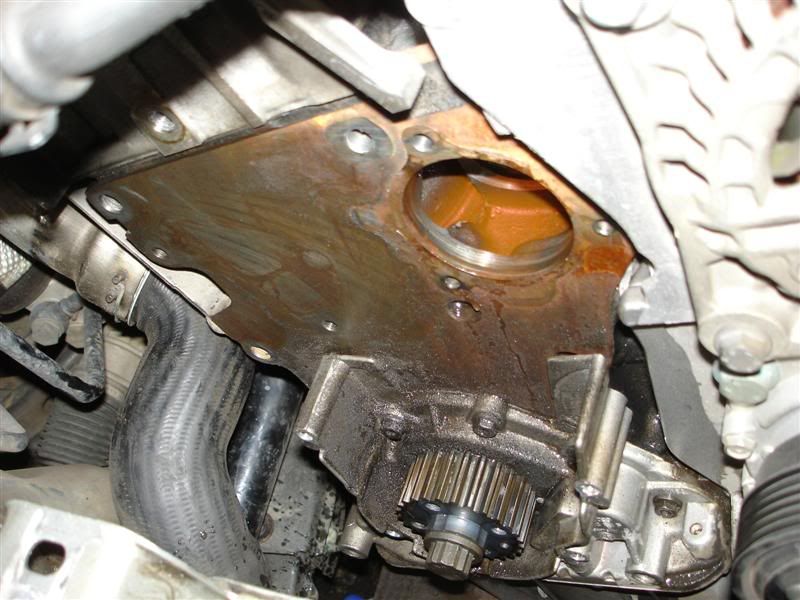
After all the coolant has drained out, loosen the 3 x 10mm bolts holding the water pump to the block and pull the water pump out of the block. If you battle to get the water pump out, insert a screwdriver between the water pump and the block and lever the water pump out.
If the plastic impeller of the water pump is broken, remove any pieces of it from the inside of the block.
20. Lubricate the O-ring seal of the new water pump with coolant and push the new pump into the block, making sure not to damage the seal. Torque the 3 x 10mm bolts to 15Nm.
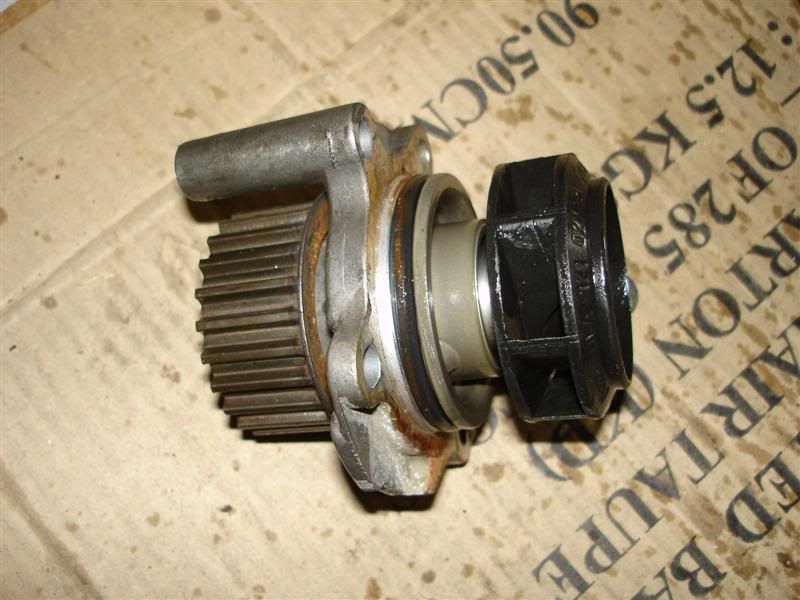
My old water pump had a plastic impeller which was still fine after 80k kms. The new water pump from VW appears (sounds) to have an aluminium impeller.
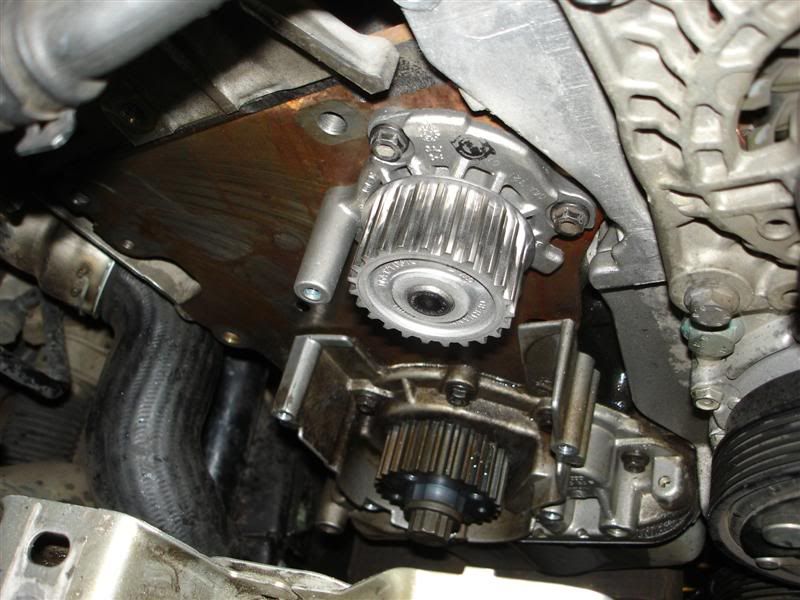
21. Fit the cambelt damper unit to the block and tighten the 2 x 10mm bolts to 15Nm
22. Fit the cambelt tensioner pulley to the block, making sure that the tensioning bracket sits on top of the cambelt damper unit piston. Tighten the 8mm Allen bolt to 25Nm.
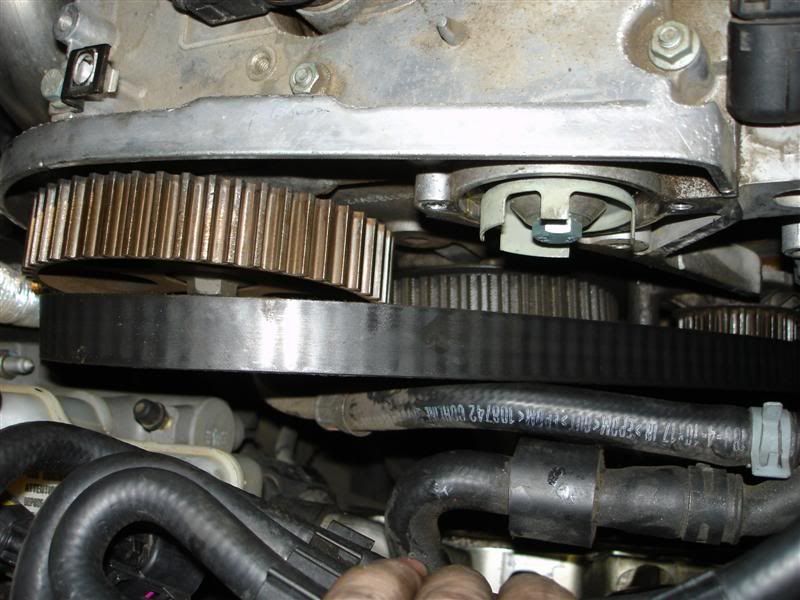
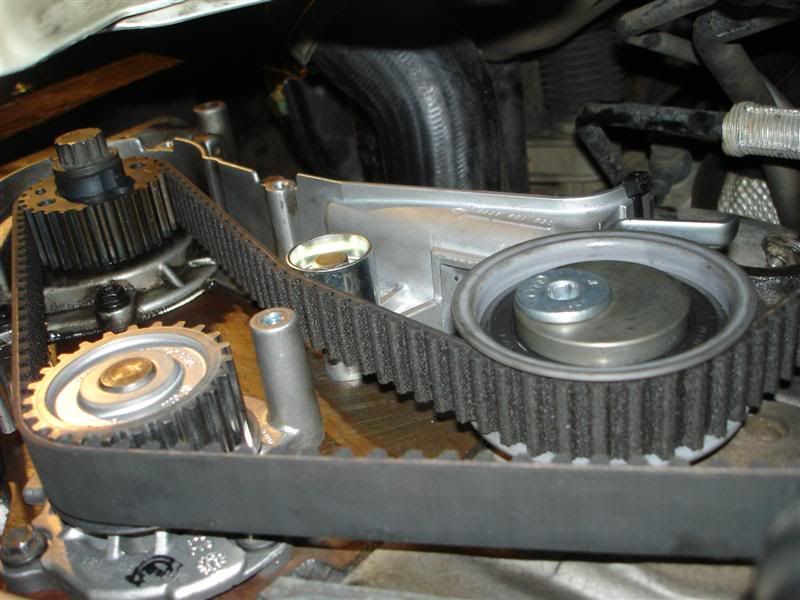
23. Double-check your timing marks and then fit the new cambelt. I started at the crankshaft sprocket, but you can also start at the camshaft sprocket.
If you can’t get the cambelt on then remove the cambelt damper unit, fit the cambelt and then re-fit the cambelt damper unit. Remember to ensure that the tensioner bracket on the cambelt tensioner pulley sits on top of the cambelt damper unit piston.
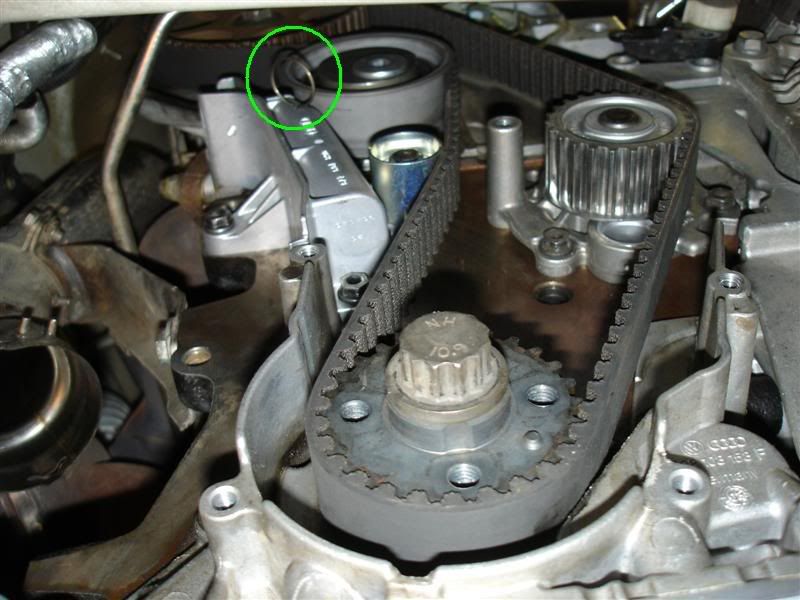
24. Check your timing marks again and if they all line up, put a 19mm multi-tooth socket onto the crankshaft sprocket bolt and turn the motor clockwise 2 full revolutions. Double-check that all the timing marks still line up.
If the marks line up, pull out the pin holding the cambelt damper unit piston in (circled in green) and the piston will push on the tensioning bracket of the cambelt tensioner pulley, which will tension the cambelt.
25. The engine mounting bracket now needs to be manoeuvred back into place from the bottom of the engine bay and then bolted to the block.
Once the engine mounting bracket has been manoeuvred into place, you can insert the bolts into the bracket. NOTE: The long bolt goes in the top right hole and you will need to lower the motor a bit to insert 1 of the 2 shorter bolts into the bottom hole. Tighten the 3 x 16mm bolts to 45Nm.
26. Now you can insert the rubber boost pipe back into the steel boost pipe from the turbo. Ensure the locating tabs on the rubber pipe line up with the notches in the steel pipe. Lever the spring clip back into position so the one end of the clip sits between the 2 tabs on the steel pipe and the clip is located in the 2 cut-outs in the steel pipe.
27. Re-fit the heat shield and press the 3 press-studs together.
28. Re-fit the lower cambelt cover using the 2 bottom 10mm bolts only. Tighten these bolts to 10Nm.
29. Re-fit the middle cambelt cover using the 3 remaining 10mm bolts. Tighten these bolts to 10Nm.

30. Re-fit the crankshaft pulley, making sure that the locating pin goes through the correct locating hole. As before, fit a 19mm multi-tooth spanner or socket to the crankshaft sprocket bolt to prevent the crankshaft from turning and tighten the 4 x 6mm Allen bolts to 25Nm.
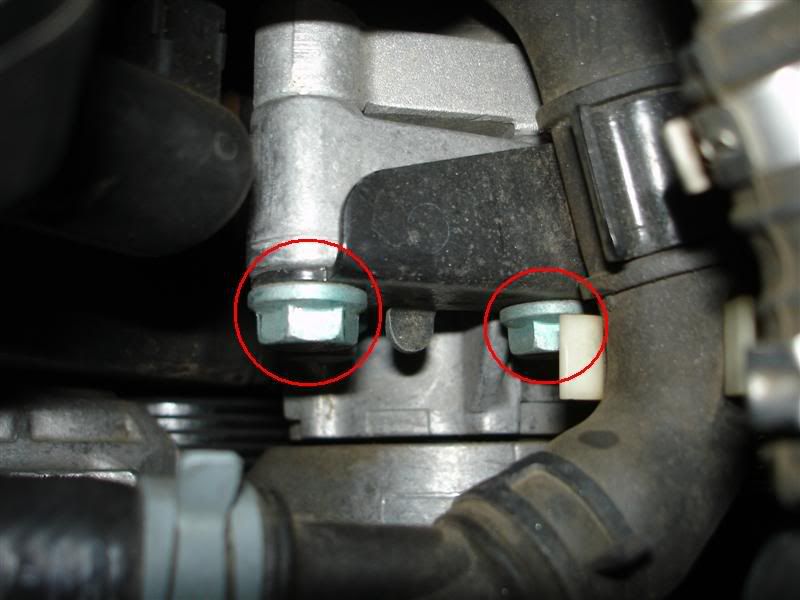
31. Re-fit the right-hand engine mounting and tighten the 2 body-to-mount bracket bolts (cirlcled in red) to 25Nm. Then tighten the 2 mount-to-body bolts (circled in yellow) to 40Nm first, and then tighten them a further 90 degrees.
Do not tighten the mount-to-engine bracket bolts (circled in green) yet.
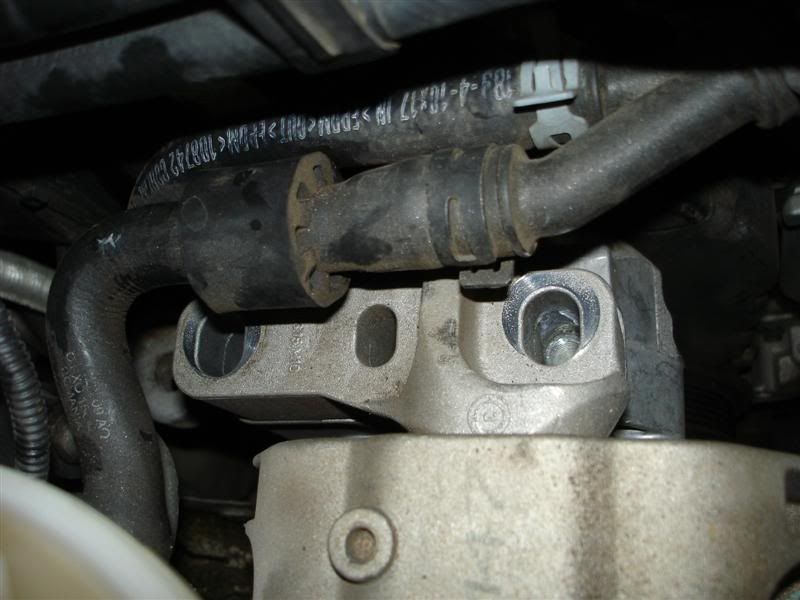
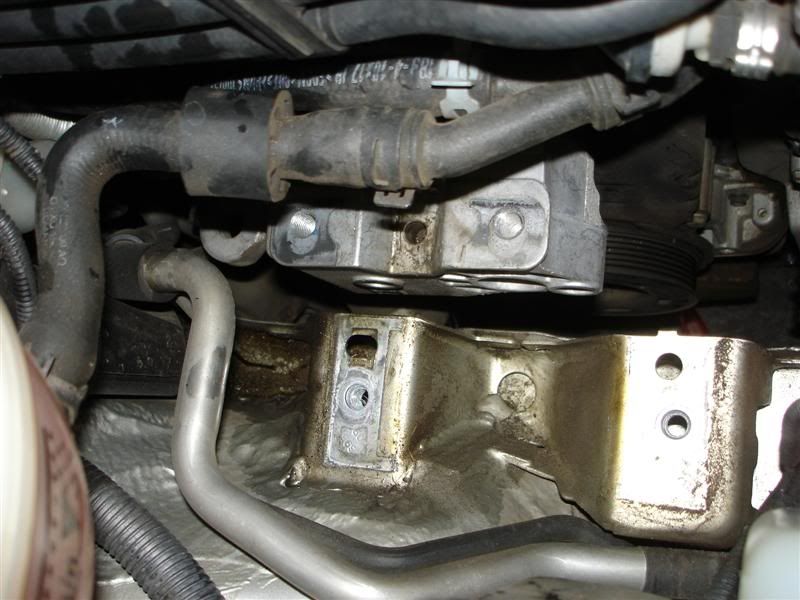
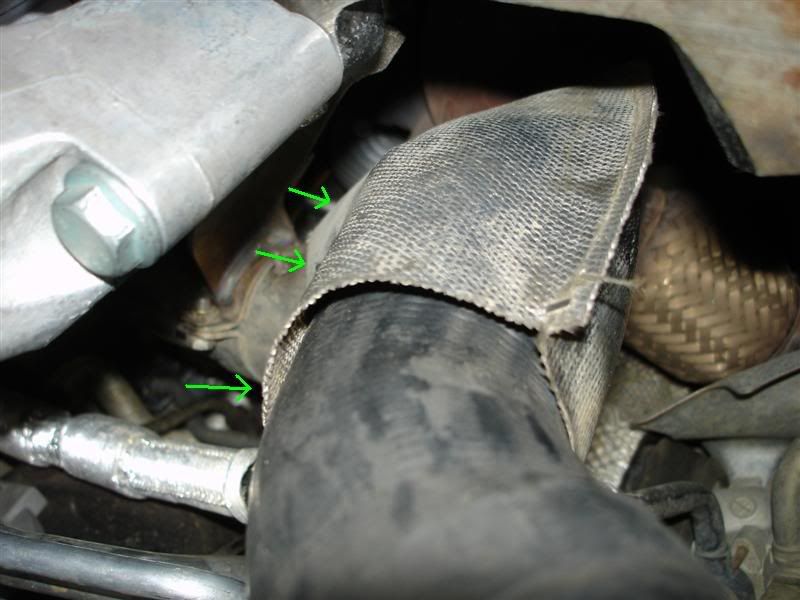
32. Raise or lower the engine so that the engine mount bracket is just touching the bottom of the engine mount.
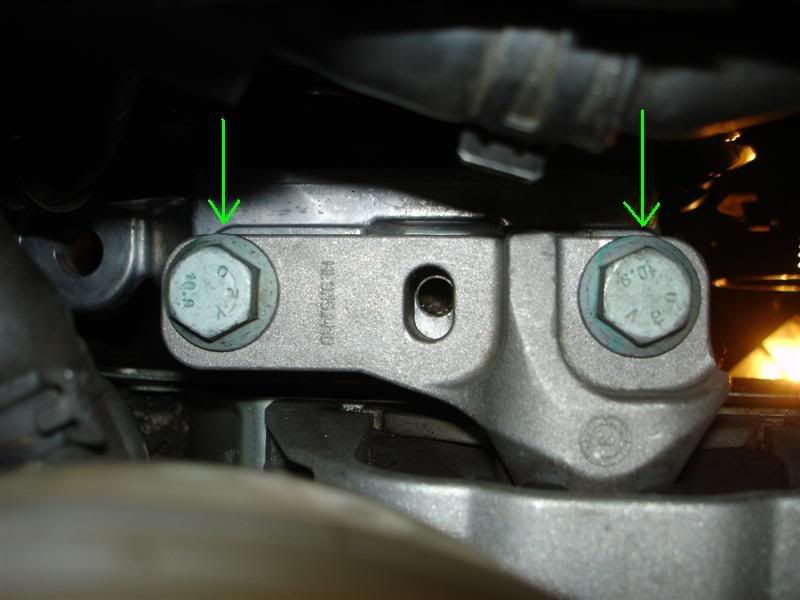
Before tightening the mount-to-engine bracket bolts you need to align the engine mount and engine correctly. To do this, move the engine mount and engine so that the heads of the 2 mount-to-engine bracket bolts sit flush with the edge of the engine mount (indicated by the green arrows).
Tighten the 2 mount-to-engine bracket bolts to 100Nm.
33. Once the engine mounting is back in place and tightened correctly, you can lower and remove the jack from under the sump. Then re-fit the upper cambelt cover, ensuring that it is correctly located with the middle cambelt cover and that the 2 clips on either side of the cover are correctly clipped onto the valve cover.
34. Re-fit the auxiliary belt tensioner, noting that the top 2 bolts secure a pipe bracket. Tighten the 3 x 13mm bolts to 25Nm.
35. Re-fit the auxiliary belt according to the direction-of-rotation marks you made when you took the belt off.
The belt runs on the outside of the crankshaft pulley, the outside of the power steering pump pulley, the inside of the aircon pump pulley, the outside of the alternator pulley and underneath the auxiliary belt tensioner.
36. Using the same process as when taking the auxiliary belt off, fit a 16mm spanner onto the auxiliary belt tensioner body and lever the spanner towards the front of the car and pull the locking drill-bit / rod out and then slowly let the tensioner tension the belt. Once the tensioner has tensioned the belt, remove the spanner.
37. Then all that’s left to do is tighten the radiator drain tap, re-fit the lower and right-hand engine covers.
Then re-fit the “pancake” boost pipe, tighten the 3 hose clamps and tighten the 10mm nut holding the “pancake” boost pipe to the body.
Then re-fit the inner wheel arch lining, put the wheel back on and lower the car.
38. Then in the engine bay, re-connect the pipe to the power steering reservoir, and tighten the 5mm Allen bolt holding the power steering reservoir to the engine mount
Then re-connect the pipe going to the charcoal canister.
Then plug the sensor plugs from the coolant expansion bottle and the charcoal canister back in.
Then tighten the Philips head screws that secure the coolant expansion bottle to the body.
39. Use the shaft of a screwdriver to open the power steering reservoir cap and check the level of the power steering fluid. If needed, top up the fluid using decent power steering fluid of the same type.
40. Pre-mix the coolant with water (2 litres of coolant with 3 litres of water) and pour it into the expansion tank until the level reaches the MAX mark. Start the car and keep topping up the coolant as the water pump pumps the water through the engine and radiator.


