DIY - Changing Lower Control Arm (LCA) Bushes - Polo 9n3
Posted: Tue Mar 08, 2011 12:48 pm
DIY - Changing Lower Control Arm (LCA) Bushes - Polo 9n3
p.s. Please note that it may not always be worth it unless you really want to do it yourself and save some cash. Well that was my conclusion when I watched professionals replace mine…VGTI wrote:Tools required:
1. Proper socket and spanner set
2. 13mm master craft ratchet spanner
3. Rubber Mallet
4. Normal hammer
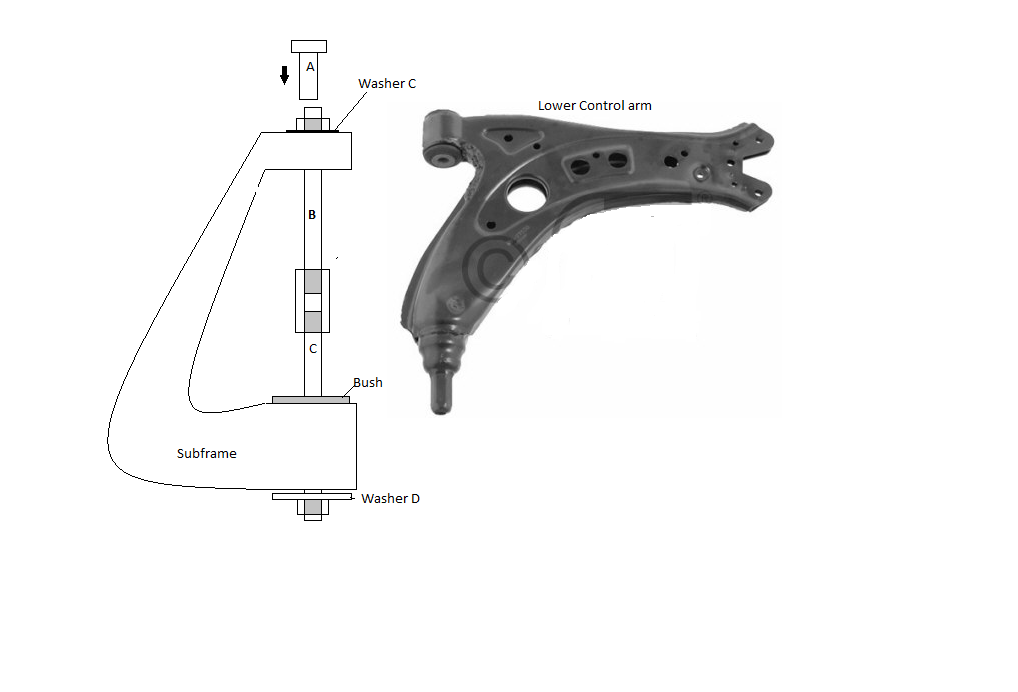
5. 2 x 170mm long 8mm threaded rod (High tensile, the normal stuff you buy at Builders WILL strip) B and C in picture 1
6. 2 x 8mm high tensile nuts
7. 1 x 200mm long 12mm threaded rod, Geen rod in Picture 2
8. 2 x 12mm high tensile nuts
9. 1 x 8mm long (40mm or more) nut (high tensile if you can get)
10. Washer A – 80mm x 4mm with 14mm hole
11. Washer B – 72mm x 4mm with 14mm hole
12. Washer C – big enough to protect aluminium sub frame with 10mm hole
13. Washer D – 60mm x 4mm with 10mm hole
14. 10mm plastic tube, like you get for fishtanks. Get from Builders.
15. Lots of patience!!
16. I think that is all
The washers I can get made up or you can cut some from superwood (it works, I’ve tried). Superwood is a bit thick so it makes things harder. Obviously if you use superwood support is with the biggest steel washers you can find!!
So to start...
Picture 1
1. First of all excuse my pictures as it is just to give you an idea
2. Jack the car up and support with a trestle
3. Remove three small bolts on the hub side of the control arm
4. Loosen drop link bolt on strut and remove
5. Loosen steering arm bolt on hub but do not remove, loosen until the lock nut just protrude past the bolt. Smack the nut (NB nut!! NOT the bolt!!!) with a hammer to release the bolt
6. Remove bolt A (in picture)
7. Now remove the lower control arm, this might require some effort
8. Assemble your “tools” as in picture 1. Note at the front of the car you need to work against the aluminium “sub frame” and not the metal bit. Otherwise the metal bit will just be bent inwards. Also put the plastic tube over threaded rod B and in the hole at the front of the subframe. This will protect the thread of the subframe
9. I’ll advise you to get a 13mm Mastercraft ratchet spanner for the front of the car
10. Start “fastening” the nut at the front of the car, you will have to hold the 40mm nut with a spanner or it will just turn and nothing will happen. The bush will start to release
11. Carry on until it is out
Picture 2
12. Now to put the bush back in...
13. Draw a line on the new bush for the centre line, note the notch at the front must be on the inside at the horizontal position as in picture B
14. Assemble your “tools” as per picture 2
15. Match the line up with the cast line on the aluminium sub frame
16. Hold the rear nut with a spanner and tighten the front with a ratchet
17. It might seem like it wants to go in skew but just keep at it, it will pull straight
18. When the bush is in you need to refit the control arm, line it up and donner it in with a mallet. You might need to wedge it in with a big screw driver at the front, when in place fasten the big nut and fasten it properly!
19. Refit the hubside, note the three legged thingy must go INTO the control arm
20. Fasten everything again, tie rod end and droplink
21. Before attemping this, ASK if you are not sure about anything!!
Disclaimer: You do this at your own risk, the above is meant as a guide only.