Golf VI GTI RNS 510 and 9WZ Bluetooth Install - Long Post
Posted: Fri Dec 17, 2010 12:16 am
There are a couple posts on the RNS 510 install, but this will cover the 9wz Bluetooth install at the same time - hope this helps someone!
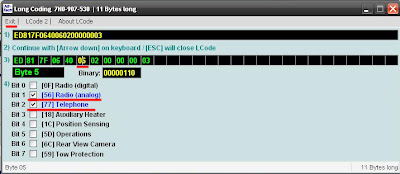
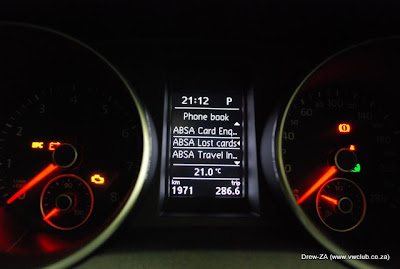
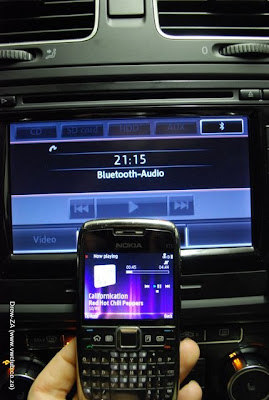
The 9wz is the latest Bluetooth module for VW/ Audi that supports normal bluetooth carkit and rSAP. rSAP effectivly takes over the sim card and uses the bluetooths GPRS / 3G radio and antenna to make calls. This saves phone battery and increases signal. You can also send and receive SMS messages in rSAP mode. More info can be found at the following locations (thank you to these people for providing all the info I have gathered):
http://www.vwclub.co.za/phpbb3/viewtopi ... 15&t=95667
http://www.vwgolfcommunity.com/download ... 20v1.4.pdf
http://vwnavi.com/showthread.php/13923- ... -the-US...
http://www.myturbodiesel.com/1000q/a5/V ... th-FAQ.htm
The full high resolution album can be viewed here: http://picasaweb.google.com/11673176426 ... directlink
For reference, this was installed in a 2010 Golf VI GTI, with DSG & Sunroof, which had the standard RCD 310 and normal speakers. The car didn't have any previous bluetooth prep and there were wasn't a bluetooth harness under the seat as per many other posts online. So effectively this was an install from scratch.
I suggest turning the car off while doing this install. Some have mentioned that you should disconnect the battery. I had mine connected the whole time and had no problems. As always - use this guide at your own risk - I don't accept any responsibility for anything bad that may happen to your car.
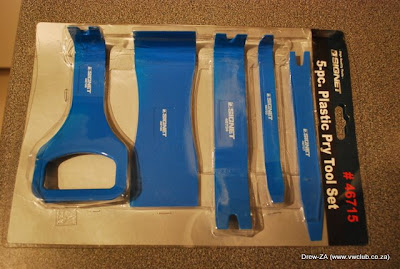
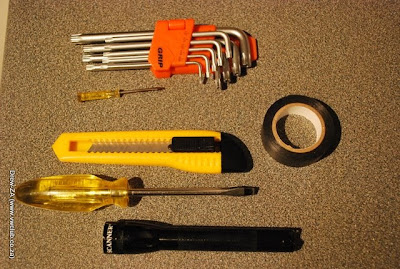
You will need the following tools:
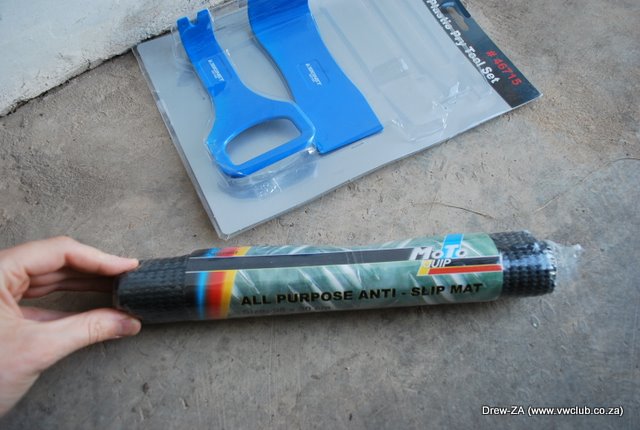
- Signet Trim Removal Tools (R260.00 incl shipping.) - You can buy this on ebay: http://stores.ebay.co.uk/davethetoolssemporium
- Flat Screw Driver, Small Screw Driver, Torch, Blade, Torx Set, Insulation Tape (All available at Builders Warehouse)
- Anti-slip Mat / Foam Padding (R60.00 - Builders Warehouse)
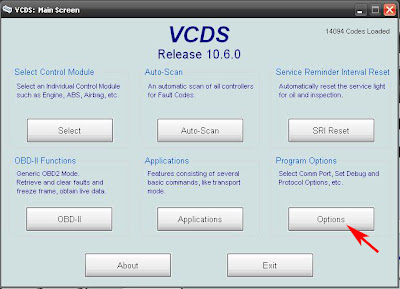
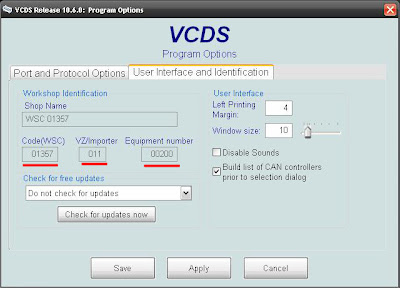
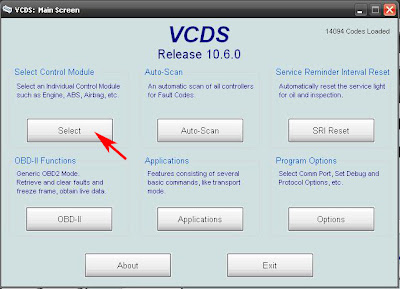
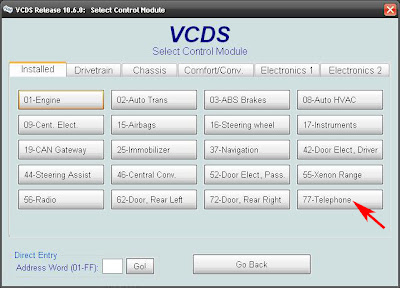
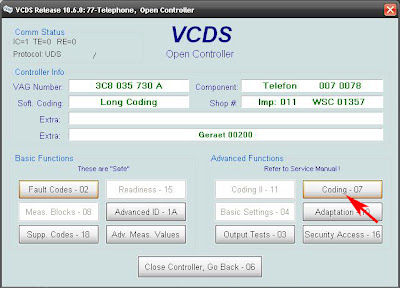
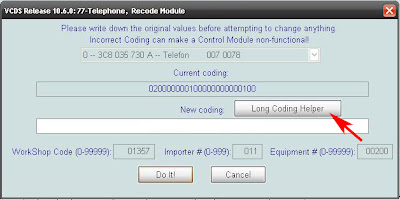
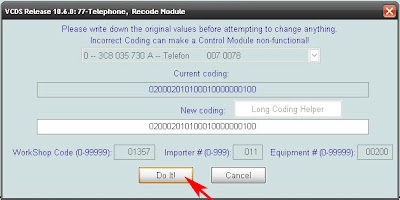
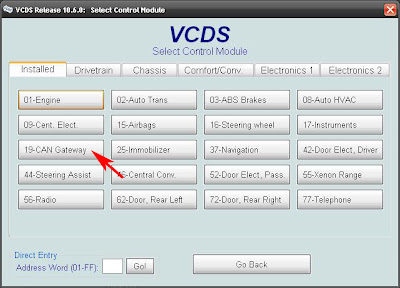
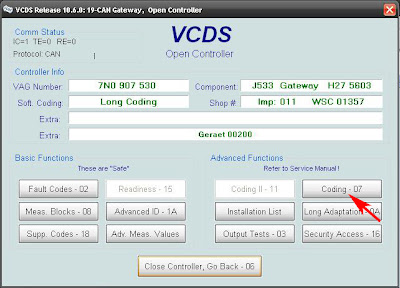
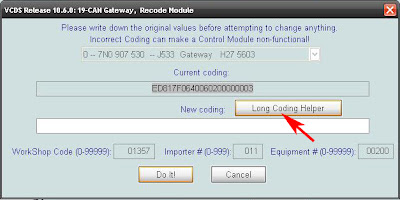
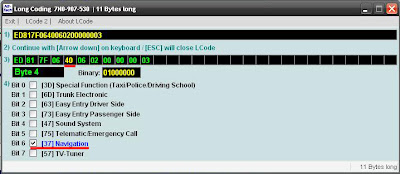
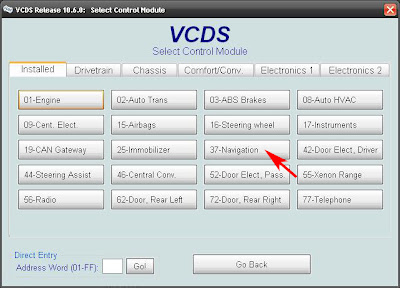
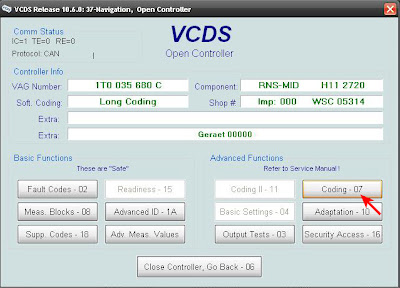
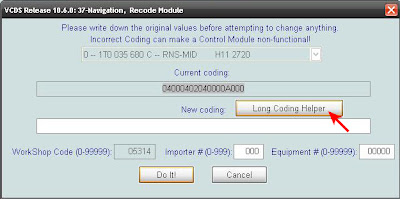
- VAG-COM Cable / VCDS version 10.6 or higher - (R900.00) http://www.electromannsa.co.za/shop/?q=node/298
- Steel wire or Steel coat-hanger for feeding cables behind the dash etc.
Parts:
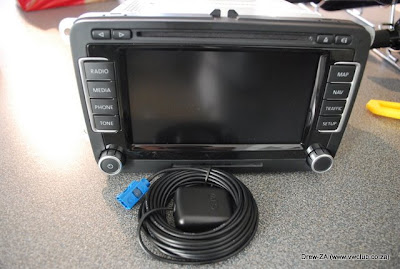
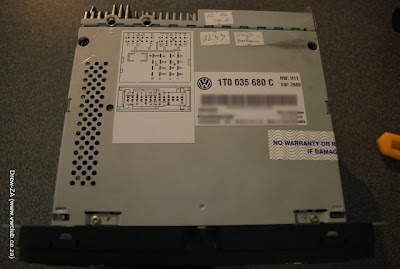
- VW RNS 510 with code card and GPS antenna .
-- R5,950.00 with 3 day TNT express shipping - Weirdly there was no import duty tax.
-- Buy it from: http://myworld.ebay.co.uk/satnavonlineuk/
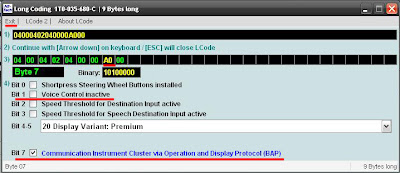
-- VW Part number: 1T0 035 680 C (It was not the new LED version).
-- Software Version: 2700 (At least that's what I remember or it's 2720)
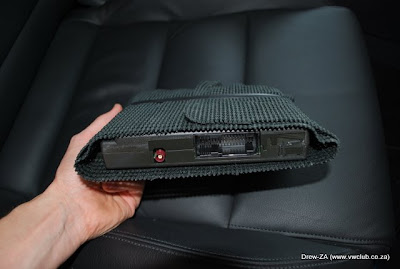
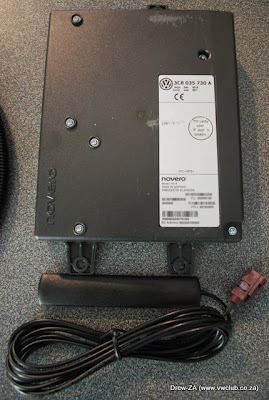
- VW 9wz Bluetooth Module with wiring harness, GPRS antenna and Mic.
-- R2,970.00 with 3 day TNT express shipping - Again weirdly there was no import duty tax.
-- Buy it from: http://myworld.ebay.com/ebaymotors/*bluewagen*
-- VW Part number: 3C8 035 730 A
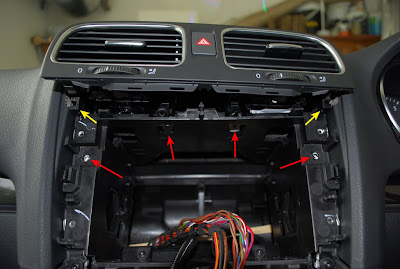
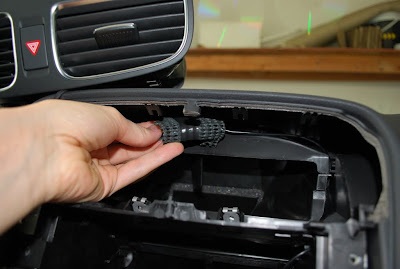
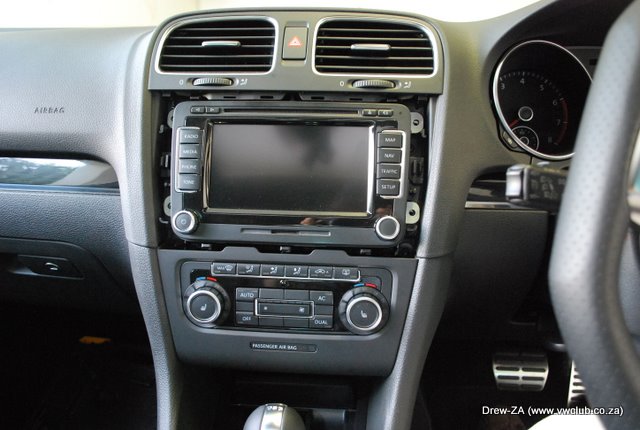
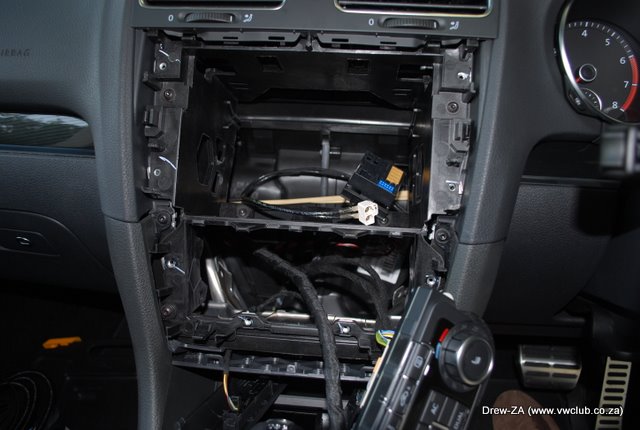
Remove the dash trim, RCD 310 and Climatronic Controls:
- Using your trim removal tool, slid it under the trim and pop it forward. Start at the bottom right and work your way up and then along the bottom left. The trim can be really stubborn, but its tough so just keep at it. You will here a loud pop noise when the clips let go - don't worry you haven't broken anything (yet ).
).
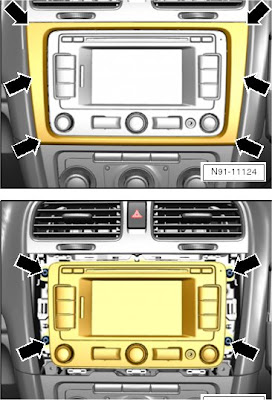
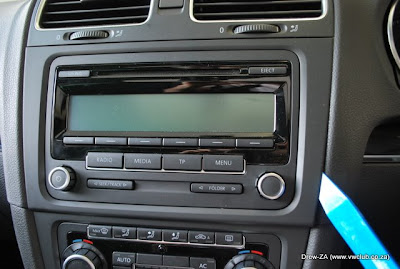
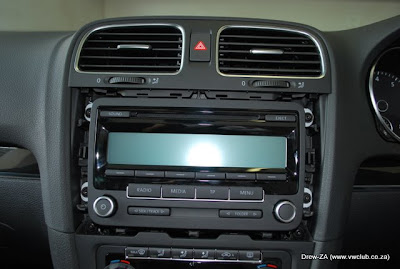
- Unscrew the for Torx screws around the radio. Pull the radio out and remove the harness and antenna wires.
- Next remove the lower trim around the Climatronic Controls. There are two clips at the top (right below the radio), pull the trim out, then it swings downs and out. I've heard you should not disconnect the airbag light as it will log a fault in the ECU.
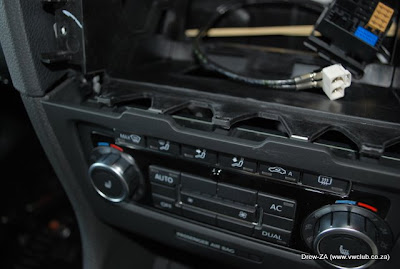
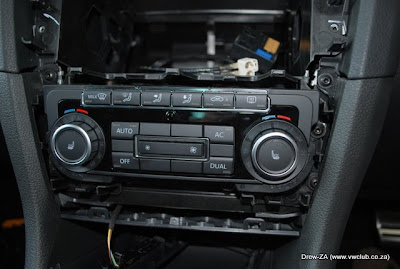
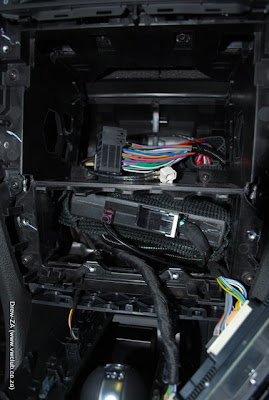
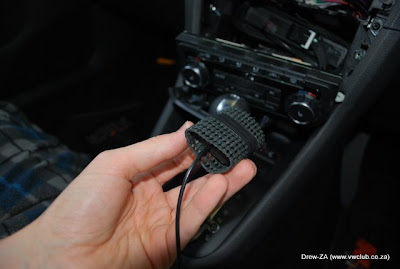
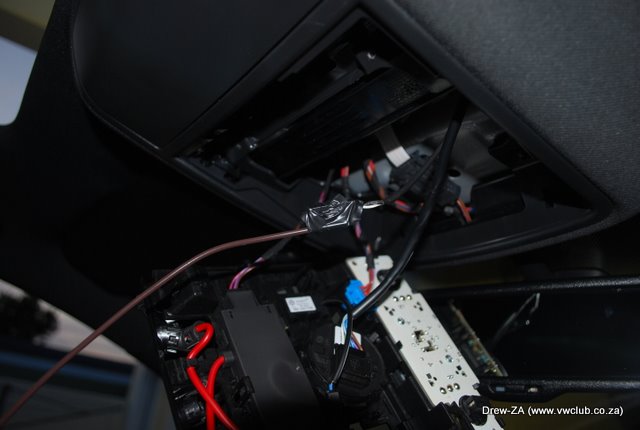
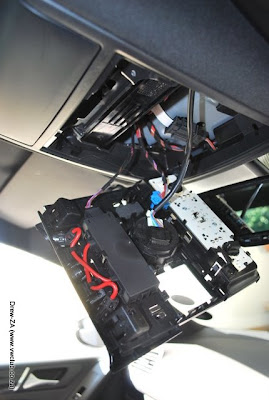
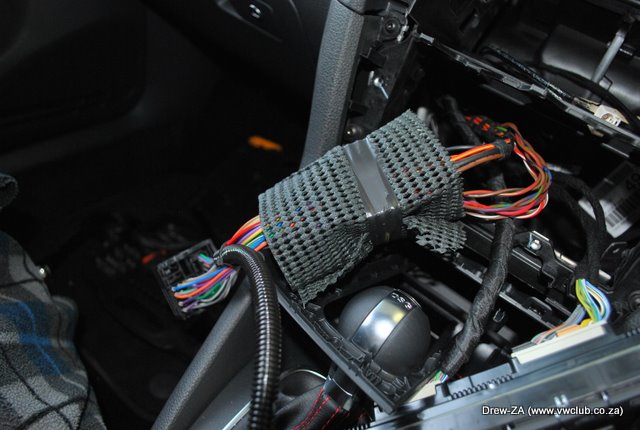
- Now remove the 4 Torx screws holding the Climatronic controls. You will now see a large space in the dash, behind where the Climatronic Controls were, this is where our 9wz Bluetooth module is going.
Remove the sunroof and map light control panel trim:
- Use your trim removal tool and ease it under the trim of the sunroof control panel. Work your way around it and the clips should just pop out.
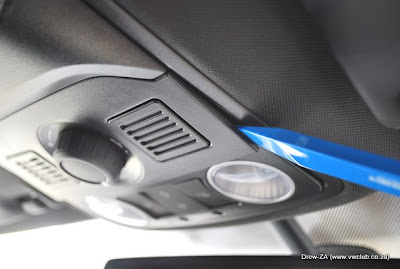
- Now do the same with the map light panel. This panel is a little more difficult when you get to the red L.E.D lights. There is a clip there that needs to pop out. Once it has popped, the panel should just come loose.
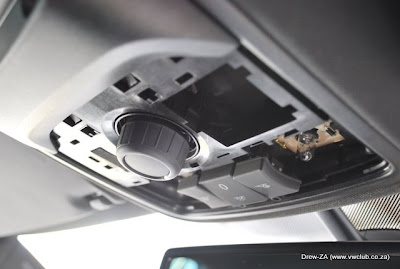
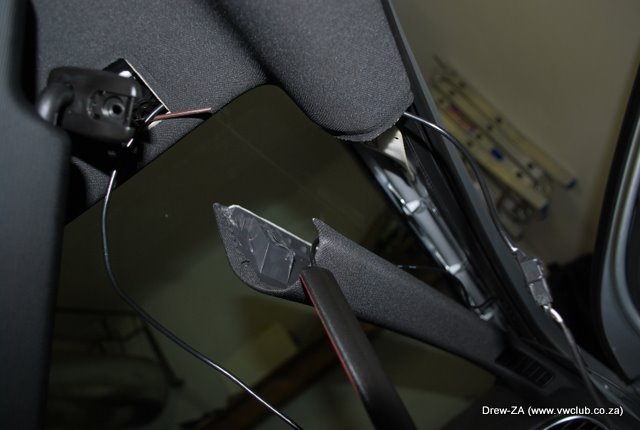
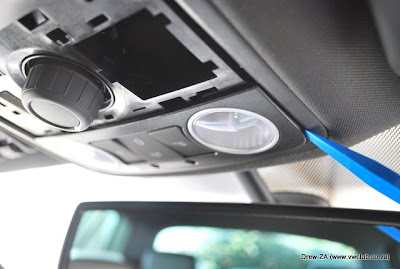
- Now move onto the security panel. This panel only has clips in the front section. It then swivels down as per the pictures.
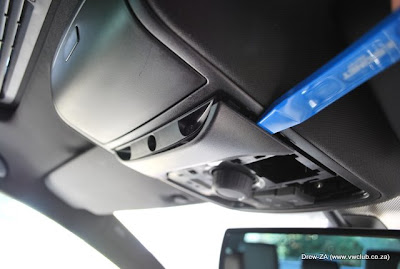
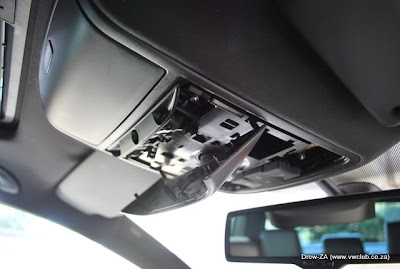
- There are 2 torx screws that need to be removed for the panel to come out of the headliner. The panel is held up by the wiring. You can leave it hanging down for now.
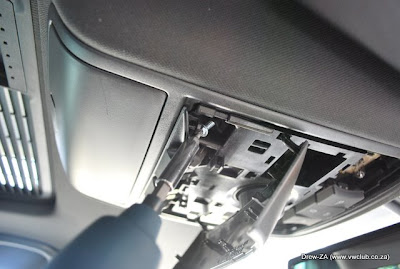
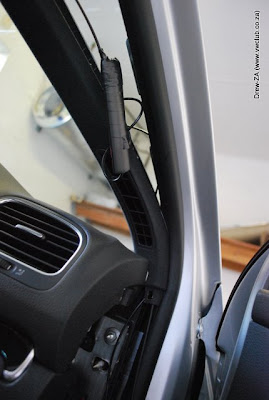
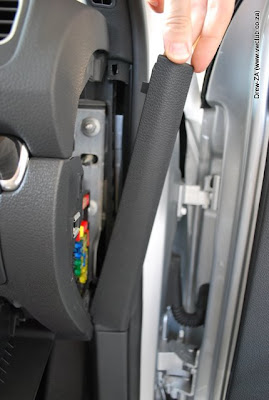
- Now remove the right hand side fuse panel. It has 3 clips holding it on (bottom, middle and top). Use your trim tool and just pry it off. Then move onto the middle section of the A-pillar. Simply pull it up from the top and out as per the picture.
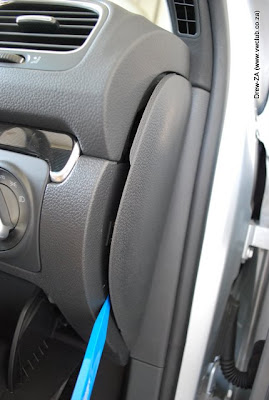
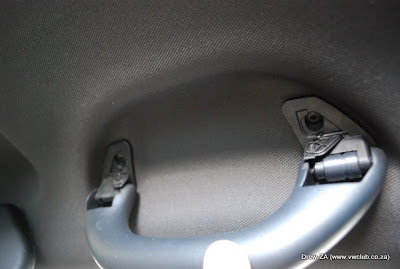
- Now unseat the right hand side sun visor. Simply pop the screw cover open with a small screw driver and then remove the torx screw. The sun visor will then come loose and will hang from its wire - leaving it loose for now. To make your life easier, also remove the right hand side handle, this allows the headliner to move more when you have to feed the mic wire. Simply pop open the screw cover, remove the 2 torx screws and then wrestle the handle loose.

- Now remove the top A-Pillar section as per this post: http://www.my-gti.com/1867/volkswagen-g ... stallation. Be careful of the "Airbag" logo as the clips can break easily. You will need a small screw driver to pinch the clips under the logo together. Go slowly and use a torch here.
Routing the cables:
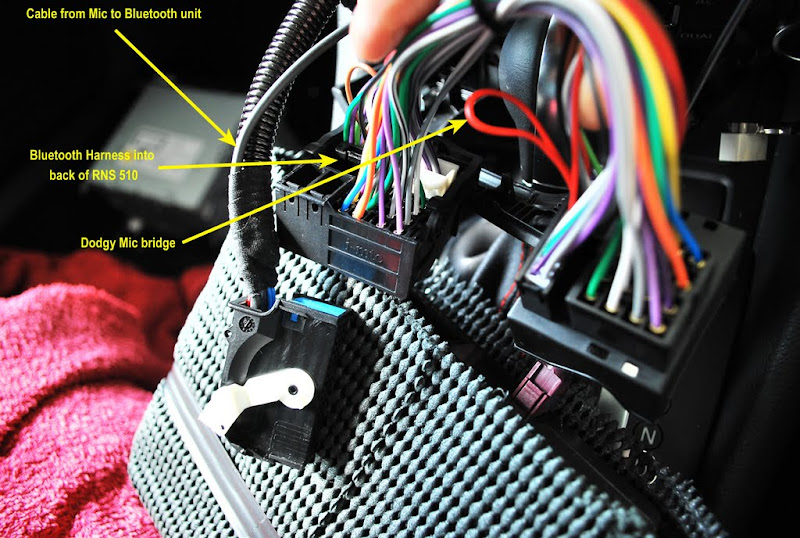
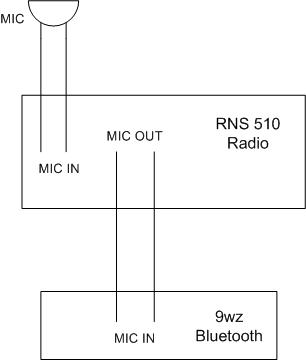
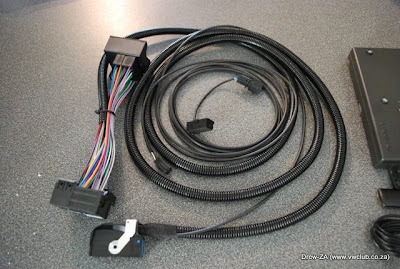
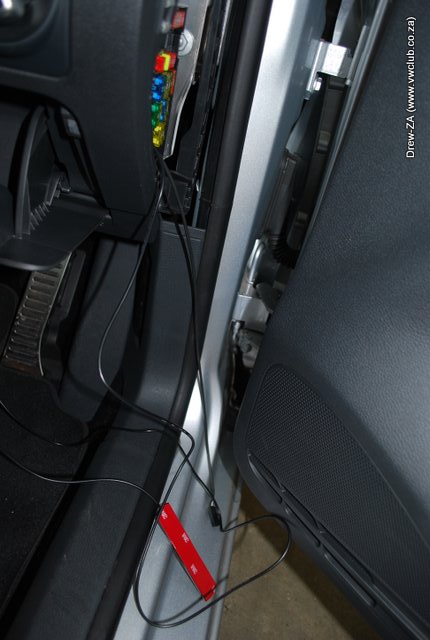
- Clip the large harness from the bluetooth wiring loom into the existing radio harness in the dash. Wrap it in some of the anti-slip mat / foam padding. Now feel deep down in the lower section of the dash where the bluetooth module will sit. You will notice that the hole goes down quite deep. Loop the remaining cable from the bluetooth wire loom and push it in there so that the is lots of space for the bluetooth model to sit in.
- Now tape the mic cable onto a long piece of steel wire (old coat hanger will do) and feed the mic cable behind the dash and steering wheel. It should pop out on the right hand side in the fuse box area.
- Un-tape the mic cable and then tape the GPRS antenna plug to the wire. Now feed the GPRS antenna cable back through the dash to the hole where the bluetooth module will sit.

continued...
The 9wz is the latest Bluetooth module for VW/ Audi that supports normal bluetooth carkit and rSAP. rSAP effectivly takes over the sim card and uses the bluetooths GPRS / 3G radio and antenna to make calls. This saves phone battery and increases signal. You can also send and receive SMS messages in rSAP mode. More info can be found at the following locations (thank you to these people for providing all the info I have gathered):
http://www.vwclub.co.za/phpbb3/viewtopi ... 15&t=95667
http://www.vwgolfcommunity.com/download ... 20v1.4.pdf
http://vwnavi.com/showthread.php/13923- ... -the-US...
http://www.myturbodiesel.com/1000q/a5/V ... th-FAQ.htm
The full high resolution album can be viewed here: http://picasaweb.google.com/11673176426 ... directlink
For reference, this was installed in a 2010 Golf VI GTI, with DSG & Sunroof, which had the standard RCD 310 and normal speakers. The car didn't have any previous bluetooth prep and there were wasn't a bluetooth harness under the seat as per many other posts online. So effectively this was an install from scratch.
I suggest turning the car off while doing this install. Some have mentioned that you should disconnect the battery. I had mine connected the whole time and had no problems. As always - use this guide at your own risk - I don't accept any responsibility for anything bad that may happen to your car.
You will need the following tools:
- Signet Trim Removal Tools (R260.00 incl shipping.) - You can buy this on ebay: http://stores.ebay.co.uk/davethetoolssemporium
- Flat Screw Driver, Small Screw Driver, Torch, Blade, Torx Set, Insulation Tape (All available at Builders Warehouse)
- Anti-slip Mat / Foam Padding (R60.00 - Builders Warehouse)
- VAG-COM Cable / VCDS version 10.6 or higher - (R900.00) http://www.electromannsa.co.za/shop/?q=node/298
- Steel wire or Steel coat-hanger for feeding cables behind the dash etc.
Parts:
- VW RNS 510 with code card and GPS antenna .
-- R5,950.00 with 3 day TNT express shipping - Weirdly there was no import duty tax.
-- Buy it from: http://myworld.ebay.co.uk/satnavonlineuk/
-- VW Part number: 1T0 035 680 C (It was not the new LED version).
-- Software Version: 2700 (At least that's what I remember or it's 2720)
- VW 9wz Bluetooth Module with wiring harness, GPRS antenna and Mic.
-- R2,970.00 with 3 day TNT express shipping - Again weirdly there was no import duty tax.
-- Buy it from: http://myworld.ebay.com/ebaymotors/*bluewagen*
-- VW Part number: 3C8 035 730 A
Remove the dash trim, RCD 310 and Climatronic Controls:
- Using your trim removal tool, slid it under the trim and pop it forward. Start at the bottom right and work your way up and then along the bottom left. The trim can be really stubborn, but its tough so just keep at it. You will here a loud pop noise when the clips let go - don't worry you haven't broken anything (yet
- Unscrew the for Torx screws around the radio. Pull the radio out and remove the harness and antenna wires.
- Next remove the lower trim around the Climatronic Controls. There are two clips at the top (right below the radio), pull the trim out, then it swings downs and out. I've heard you should not disconnect the airbag light as it will log a fault in the ECU.
- Now remove the 4 Torx screws holding the Climatronic controls. You will now see a large space in the dash, behind where the Climatronic Controls were, this is where our 9wz Bluetooth module is going.
Remove the sunroof and map light control panel trim:
- Use your trim removal tool and ease it under the trim of the sunroof control panel. Work your way around it and the clips should just pop out.
- Now do the same with the map light panel. This panel is a little more difficult when you get to the red L.E.D lights. There is a clip there that needs to pop out. Once it has popped, the panel should just come loose.
- Now move onto the security panel. This panel only has clips in the front section. It then swivels down as per the pictures.
- There are 2 torx screws that need to be removed for the panel to come out of the headliner. The panel is held up by the wiring. You can leave it hanging down for now.
- Now remove the right hand side fuse panel. It has 3 clips holding it on (bottom, middle and top). Use your trim tool and just pry it off. Then move onto the middle section of the A-pillar. Simply pull it up from the top and out as per the picture.
- Now unseat the right hand side sun visor. Simply pop the screw cover open with a small screw driver and then remove the torx screw. The sun visor will then come loose and will hang from its wire - leaving it loose for now. To make your life easier, also remove the right hand side handle, this allows the headliner to move more when you have to feed the mic wire. Simply pop open the screw cover, remove the 2 torx screws and then wrestle the handle loose.
- Now remove the top A-Pillar section as per this post: http://www.my-gti.com/1867/volkswagen-g ... stallation. Be careful of the "Airbag" logo as the clips can break easily. You will need a small screw driver to pinch the clips under the logo together. Go slowly and use a torch here.
Routing the cables:
- Clip the large harness from the bluetooth wiring loom into the existing radio harness in the dash. Wrap it in some of the anti-slip mat / foam padding. Now feel deep down in the lower section of the dash where the bluetooth module will sit. You will notice that the hole goes down quite deep. Loop the remaining cable from the bluetooth wire loom and push it in there so that the is lots of space for the bluetooth model to sit in.
- Now tape the mic cable onto a long piece of steel wire (old coat hanger will do) and feed the mic cable behind the dash and steering wheel. It should pop out on the right hand side in the fuse box area.
- Un-tape the mic cable and then tape the GPRS antenna plug to the wire. Now feed the GPRS antenna cable back through the dash to the hole where the bluetooth module will sit.
continued...